Sculpture-Making Process

I get a lot of questions about how I create my sculptures, so this page explains some of the processes behind the work.
Sculpture-Making Process
Sculpture-Making Process
I begin most sculptures on a computer, but I do not want the finished work to feel digital.
The screen is where I work out proportion, movement, balance, and the strange little emotional problem inside the form. Houdini and ZBrush let me push the sculpture before it becomes expensive, heavy, fragile, or impossible to change. But the final object still has to survive the real world. It has to deal with heat, gravity, welding, grinding, polishing, stone dust, kiln schedules, shipping crates, fingerprints, and human judgment.
That is where the work becomes sculpture.
My process sits between digital precision and very old material knowledge. I use contemporary tools to design the form, then traditional fabrication methods to make it physically present. Crystal, stainless steel, marble, granite, and bronze all behave differently. They do not just change the look of a sculpture. They change its emotional temperature.
Stainless steel reflects the world back at you. Crystal holds light inside itself. Stone gives the form weight, silence, and geological time. Bronze carries an older sculptural language of heat, casting, patina, and touch.
The same animal can become different emotional states depending on the material. That is why the making process matters. Material is not just the vehicle. Material is part of the idea.
The materials may look controlled, polished, and finished, but the feeling underneath is not always calm. That tension is important to me: controlled surfaces carrying unstable inner states. A sculpture can look smooth on the outside and still hold a roar, a held breath, a laugh, a sob, or a small private collapse inside it.
- I design the sculpture digitally
- I refine the movement, expression, proportion, and surface flow.
- I create renders, reference views, or a 3D-printed maquette.
- The design is translated into the right physical process: crystal casting, metal casting, stainless-steel fabrication, or stone carving.
- The sculpture is shaped, cast, carved, welded, or assembled by hand.
- The surface is corrected through grinding, sanding, polishing, sandblasting, patination, or other finishing methods.
- The final work is inspected for proportion, surface quality, emotional presence, and material integrity.
- The sculpture is packed, shipped, installed, or prepared for collection.
Video
Lost-Wax Crystal Casting
My crystal sculptures are made using a form of lost-wax kiln casting. It is related to the traditions of Lalique, pâte de verre, and Chinese liuli, but it is not exactly the same thing. Every artist, studio, and foundry has its own methods, recipes, firing schedules, and tricks learned through failure.
The basic idea is ancient: make the form in wax, surround it with a heat-resistant mold, remove the wax, and use the empty space it leaves behind to create the final sculpture.
With bronze, molten metal is usually poured into the mold. With crystal, the process is different. The crystal is loaded into or above the mold and melted inside a kiln. The glass flows slowly into the cavity as the temperature rises. It is less dramatic than a bronze pour, but less forgiving in many ways.
A crystal piece can fail because of a wrong temperature, a trapped bubble, uneven thickness, a bad firing schedule, or cooling too quickly. The kiln cannot simply be opened when the glass looks done. The sculpture has to cool through a controlled annealing schedule. This can take days. If the cooling is rushed, the internal stress can cause the piece to crack, split, or sometimes fail completely.
After the casting comes the less glamorous part, and usually the part people do not see. The mold is broken away. Sprues are cut off. The rough surface is ground back. Details are chased and cleaned. Edges are corrected. Some surfaces are polished. Some are sandblasted so they hold light softly instead of reflecting it sharply.
I use lead-free crystal. The colour is not painted onto the surface. It comes from metal oxides in the glass batch, so the colour forms inside the material itself. This is one reason colour editions are slow and technical. A colour edition can take around 40 days to produce, depending on the firing, cooling, finishing, and inspection.
I like crystal because it never holds light still. It changes as you move around it. It can look quiet from one angle and suddenly alive from another. That makes it a strange material for animal forms, especially animals caught in movement. The body is frozen, but the light keeps moving.
Steps
1) Create the prototype
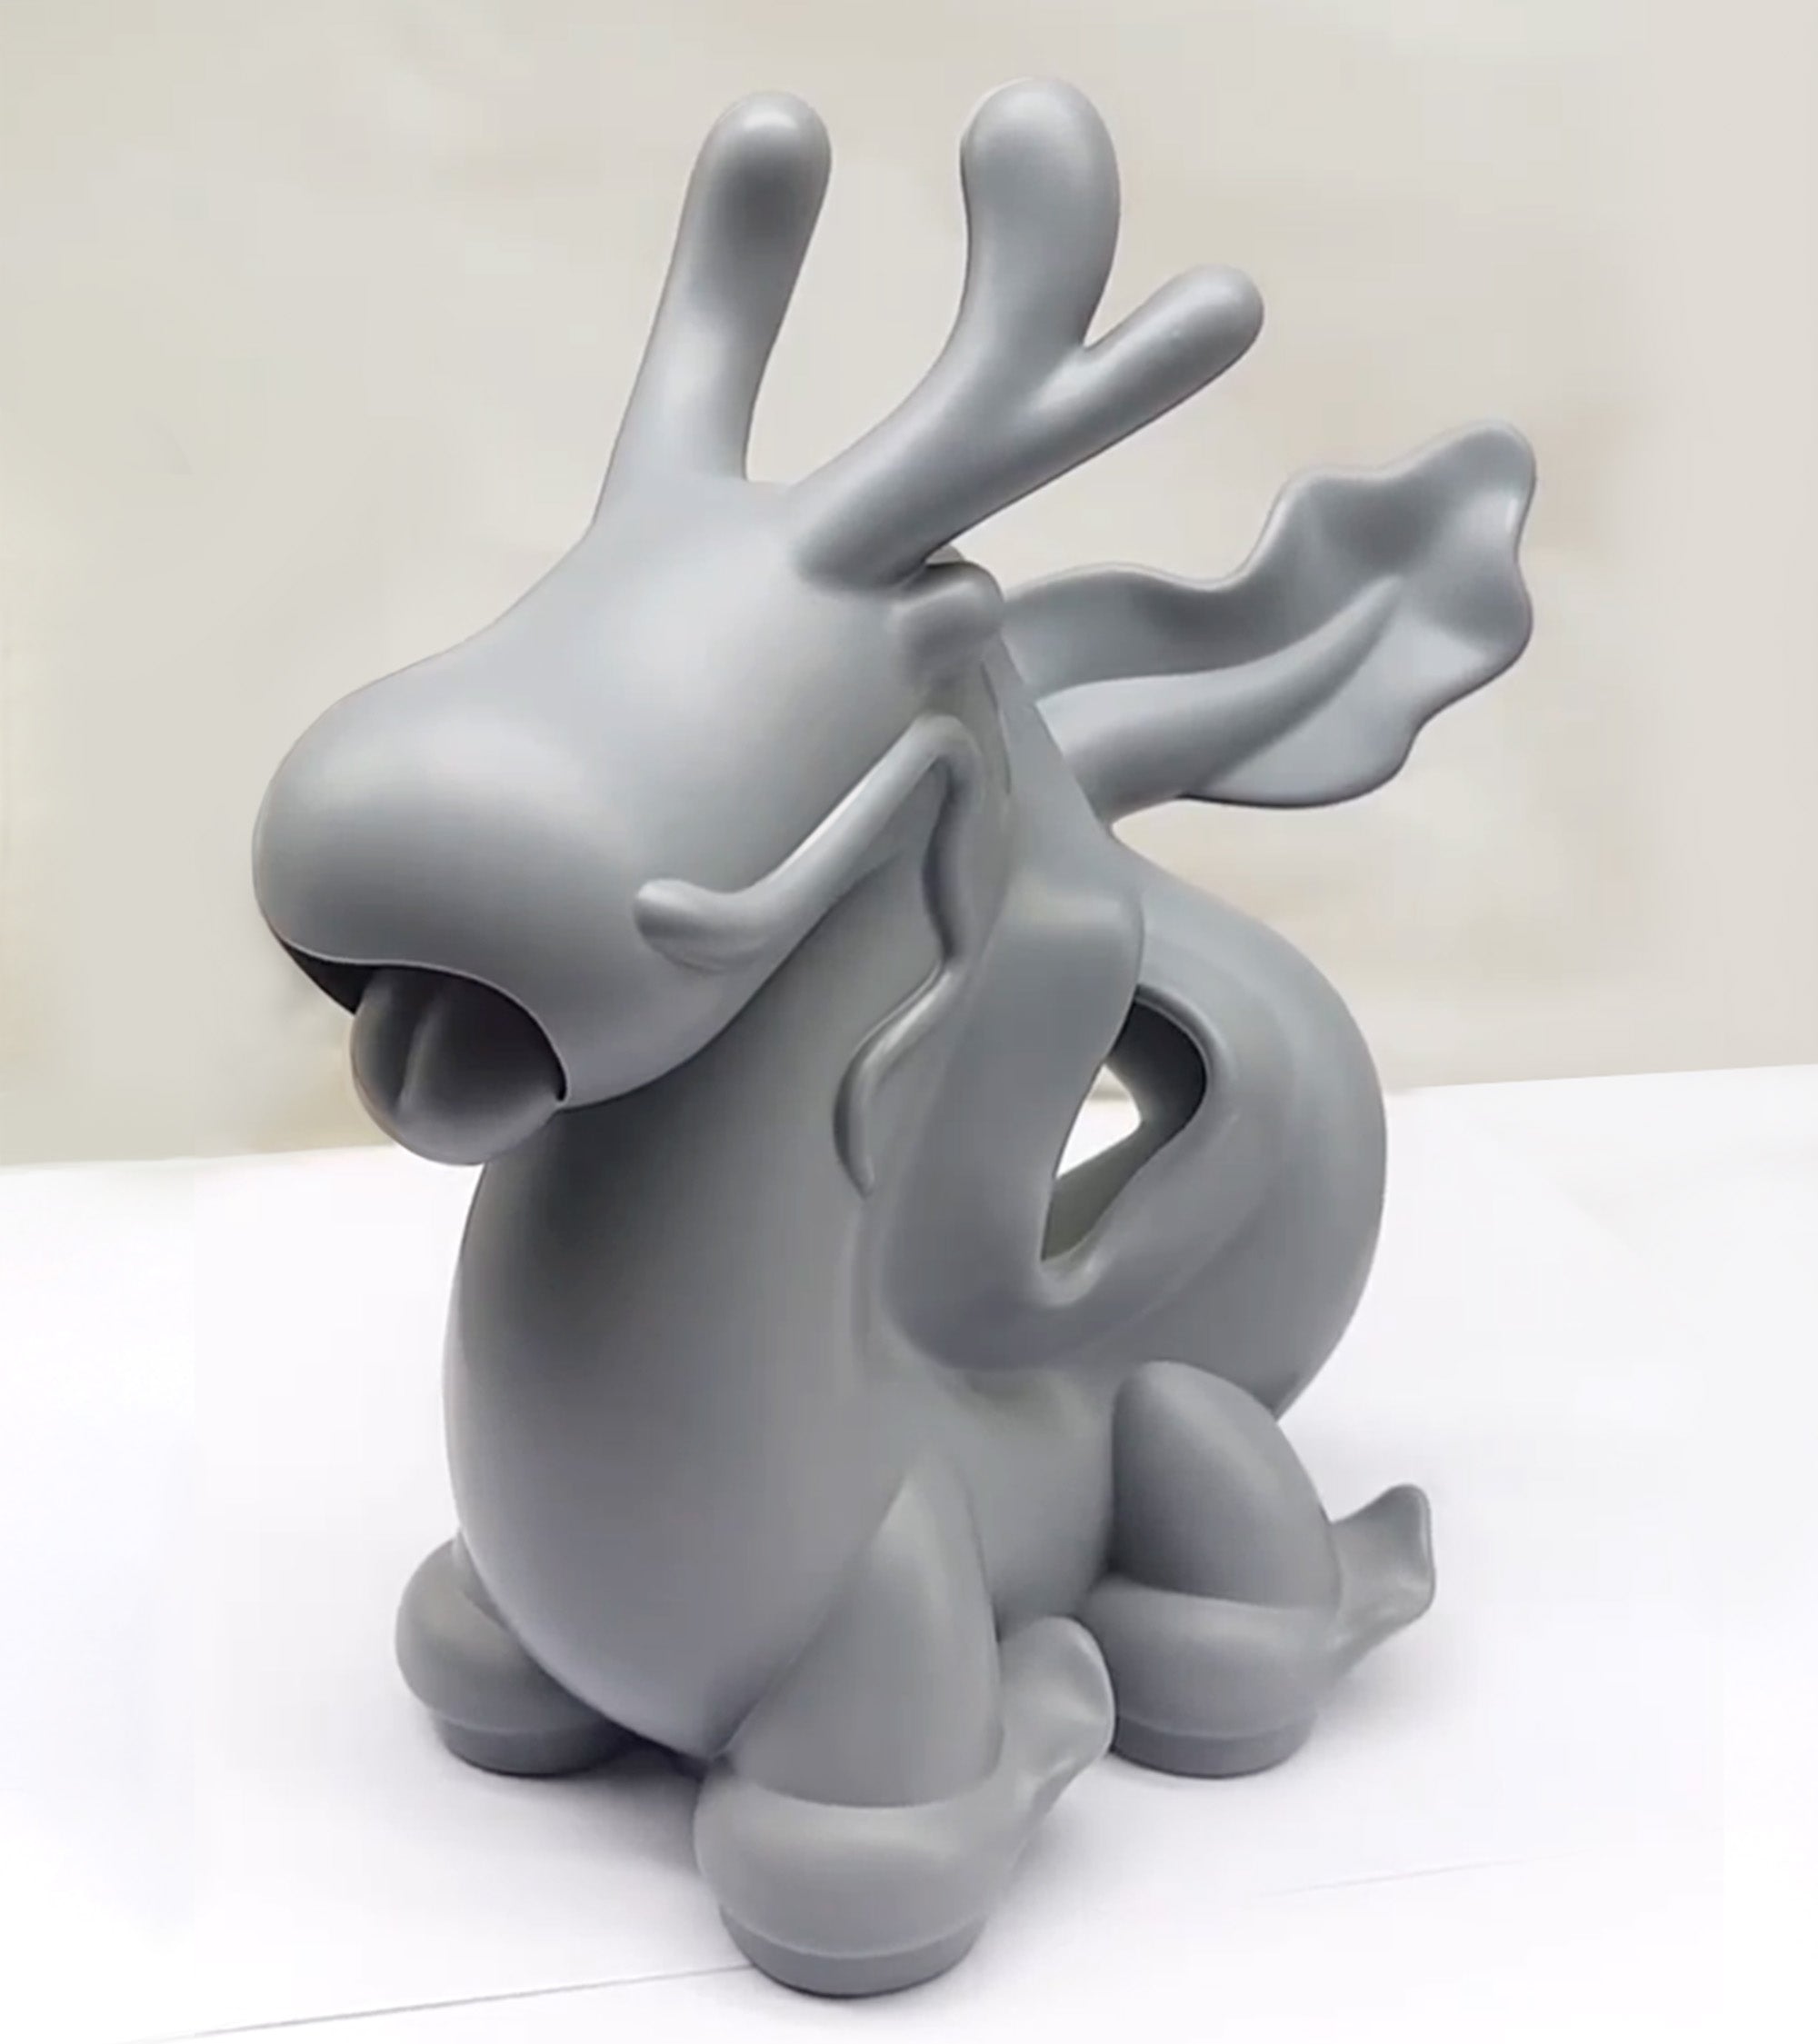
I start with a 3D-printed prototype. It fixes the proportions and the surface flow. This model becomes the reference for every step that follows.
2) Make a latex mold and wax copy
I cast a flexible latex mold over the prototype. From that mold I pour a wax copy. Wax shows every mark, so I fettle and clean the wax until the surface is right.
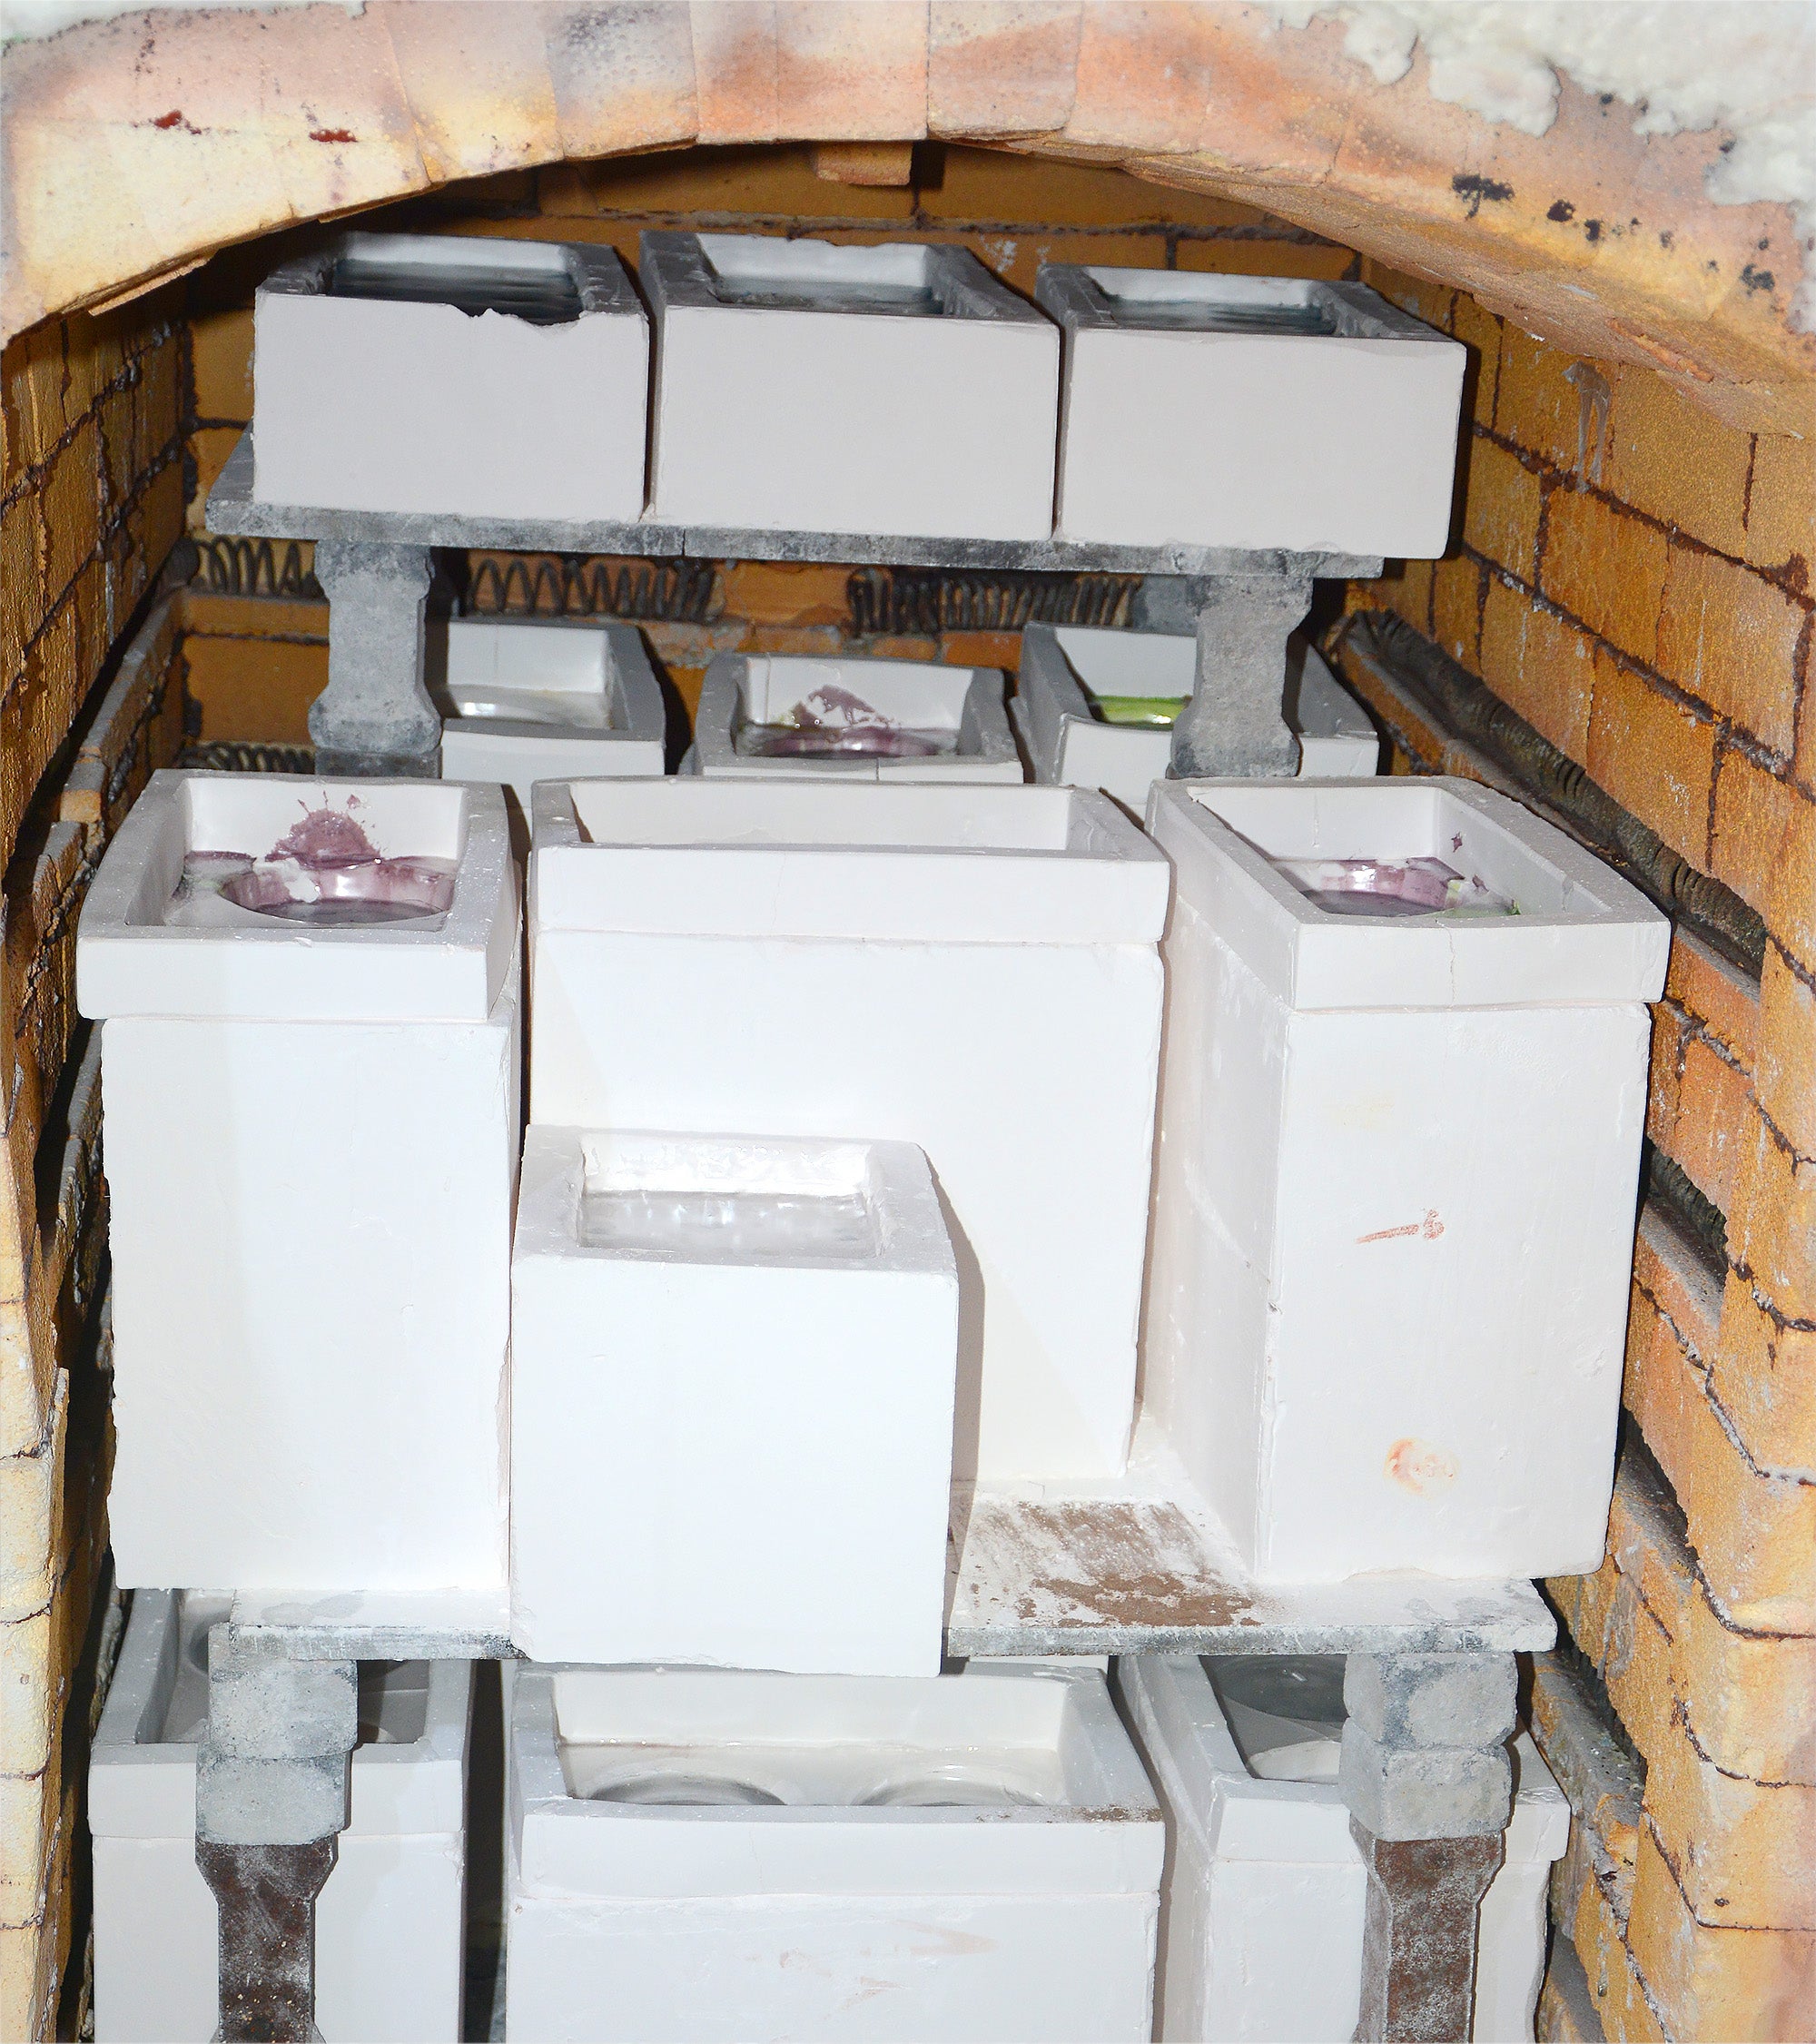
3) Build the ceramic mold
I invest the wax in a refractory ceramic shell. The shell is baked in the kiln. The heat removes the wax and leaves a clean cavity that will take molten crystal.
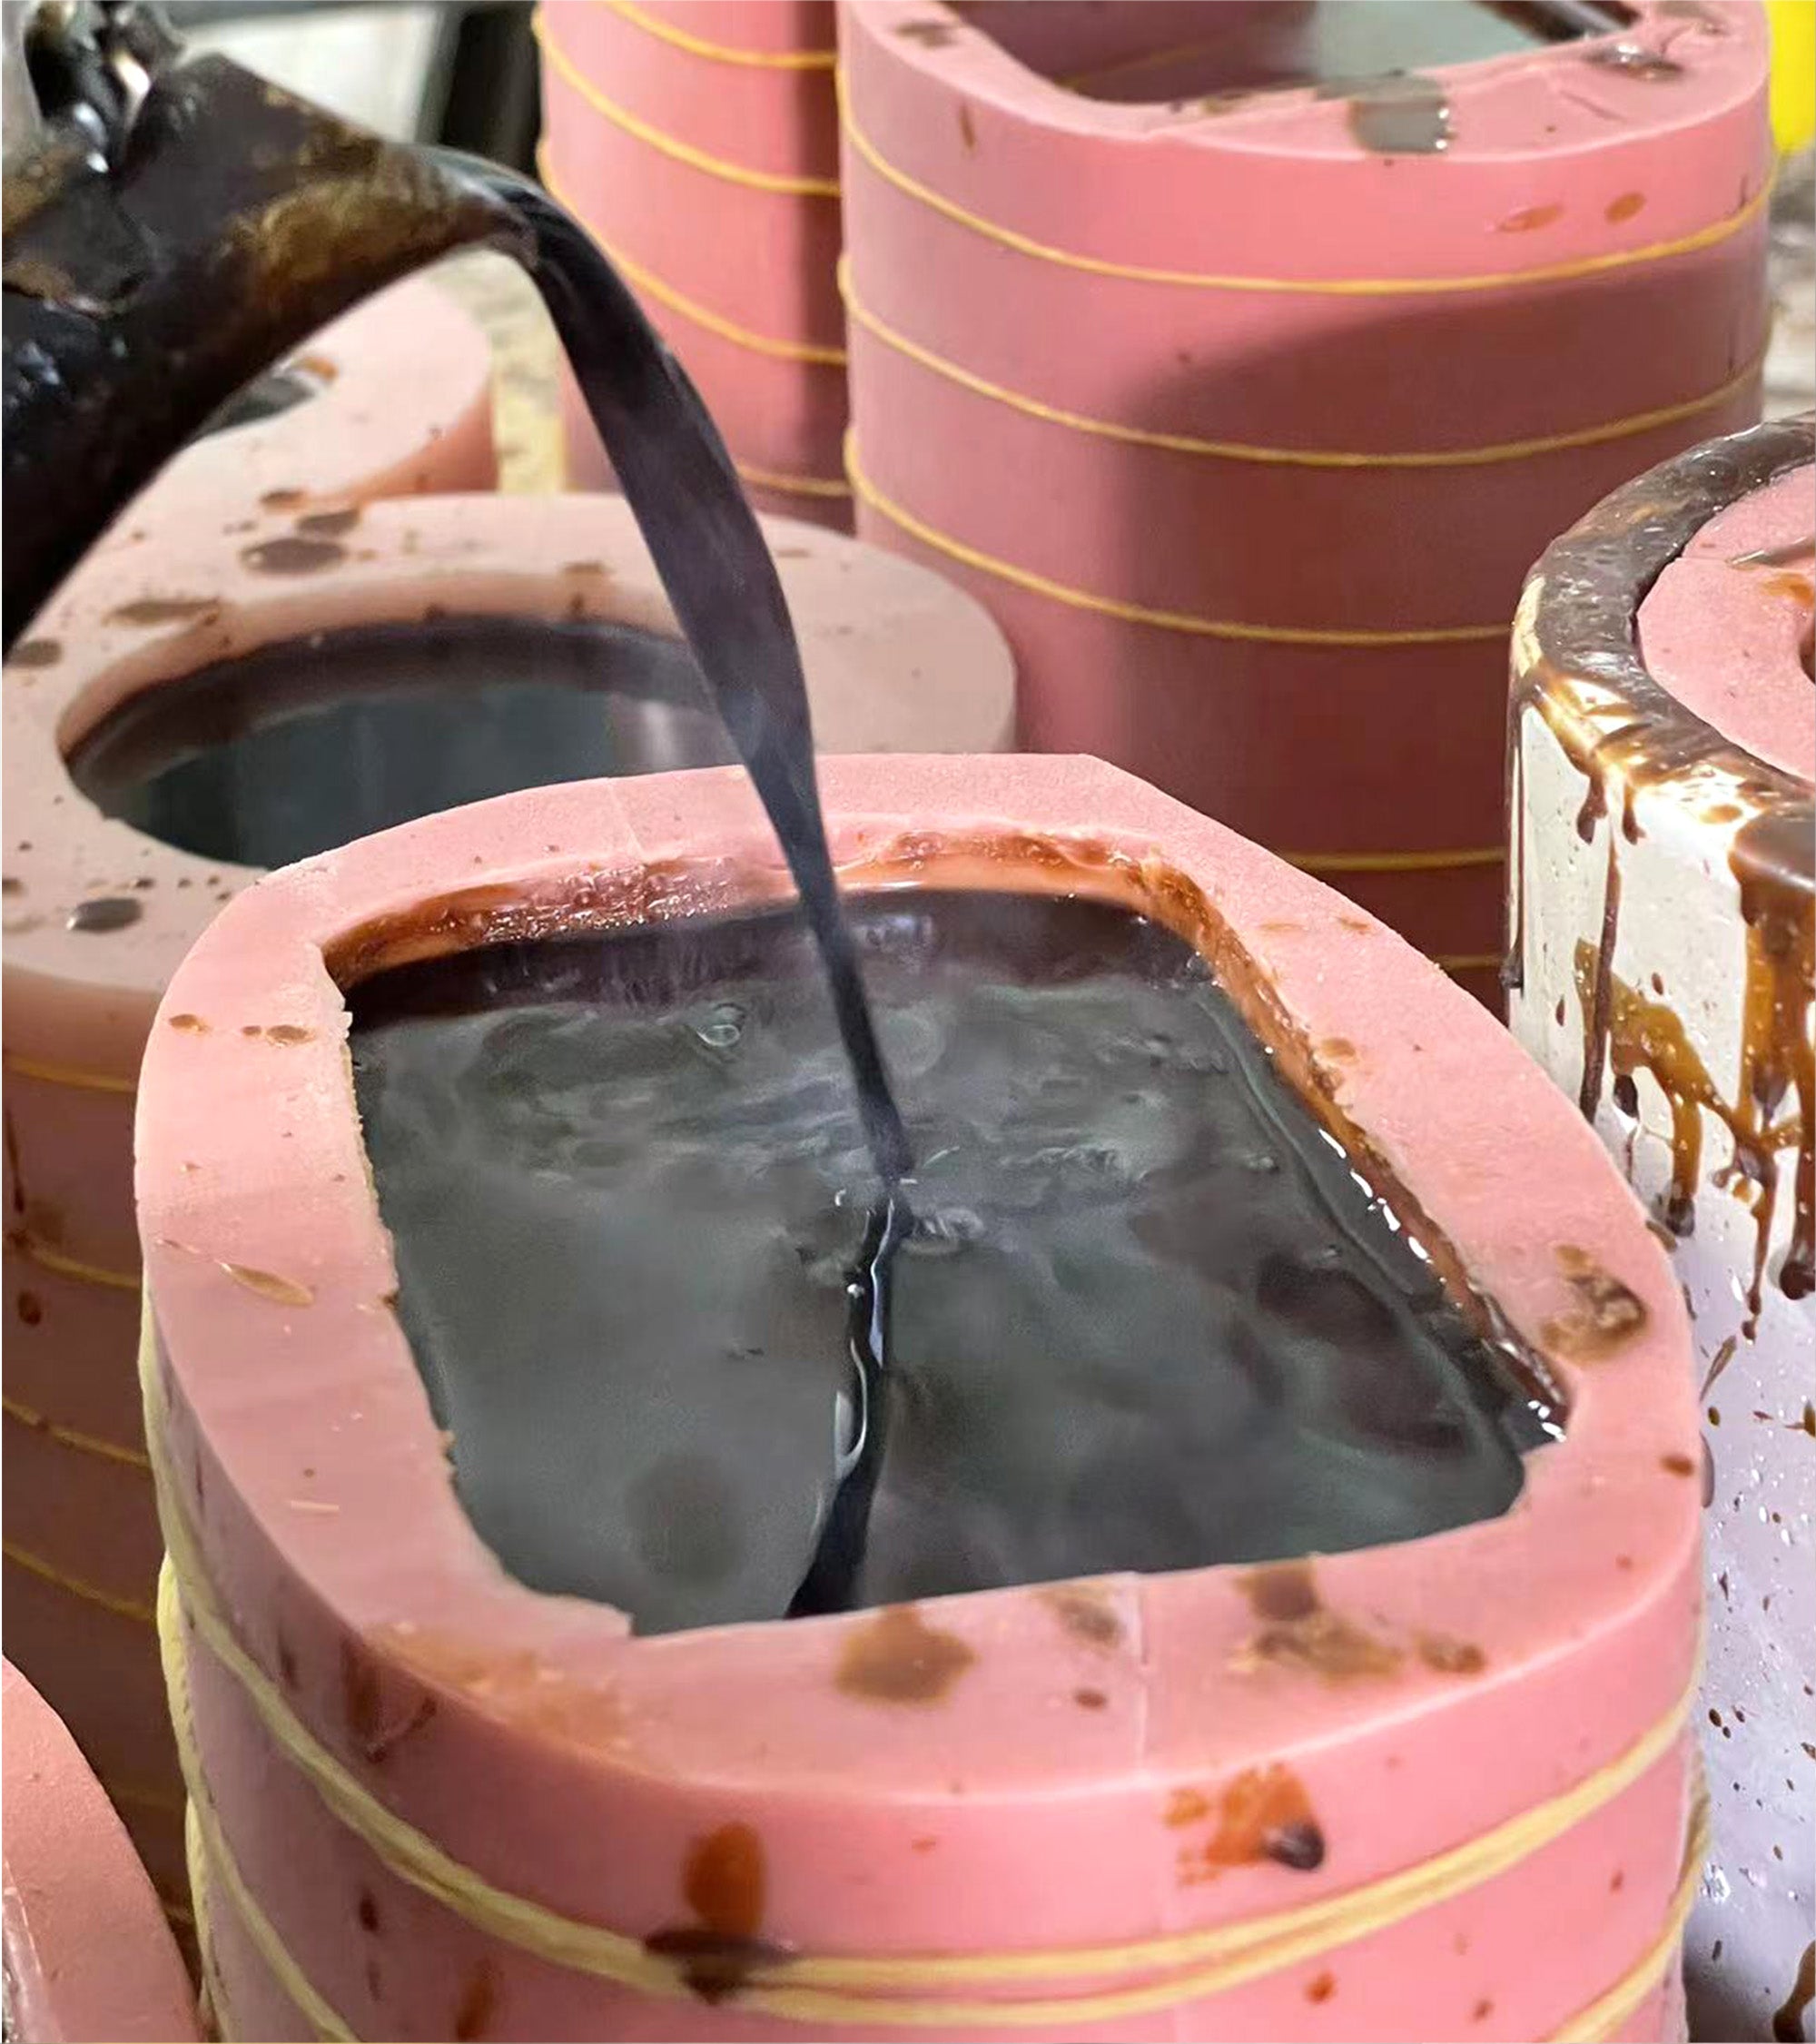
4) Cast the crystal
I load measured crystal into the mold and fire it on a controlled schedule. Temperature and time are critical. Too fast and the piece will crack. Too cool and the details are lost.
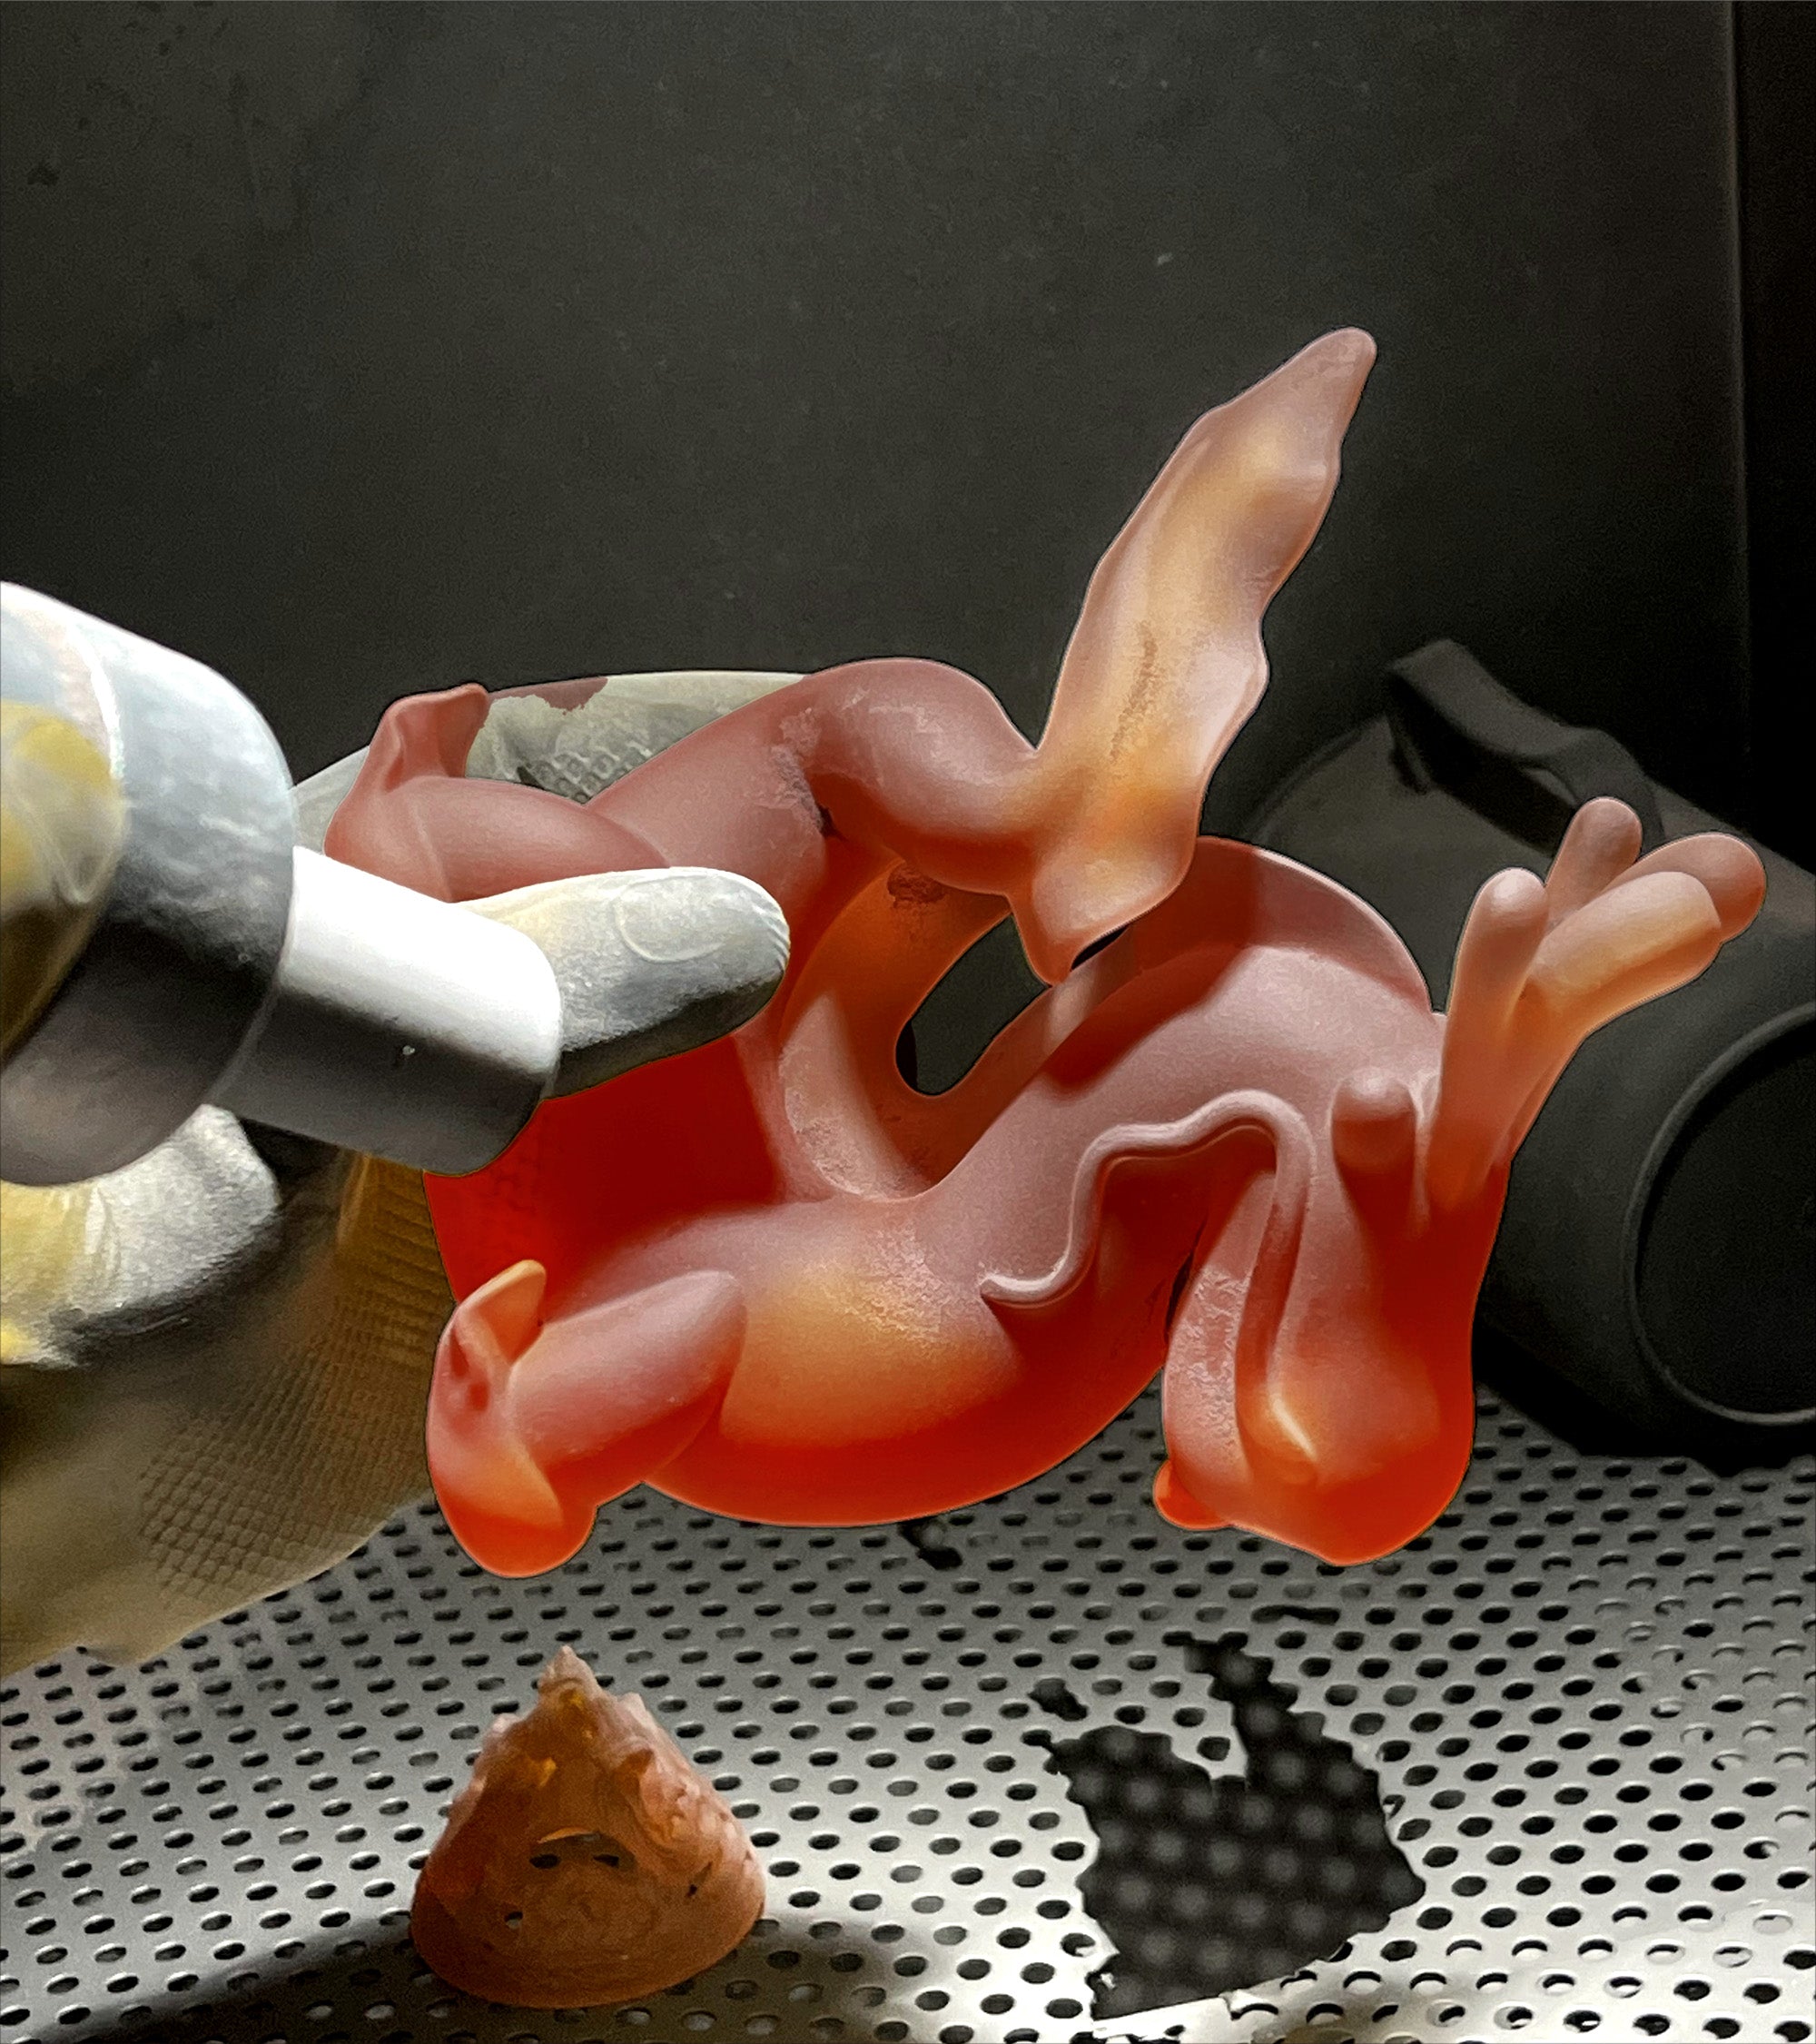
5) De-mold
When the glass has cooled, I break the ceramic away by hand. This exposes a rough casting with sprues and kiln skin that must be removed.
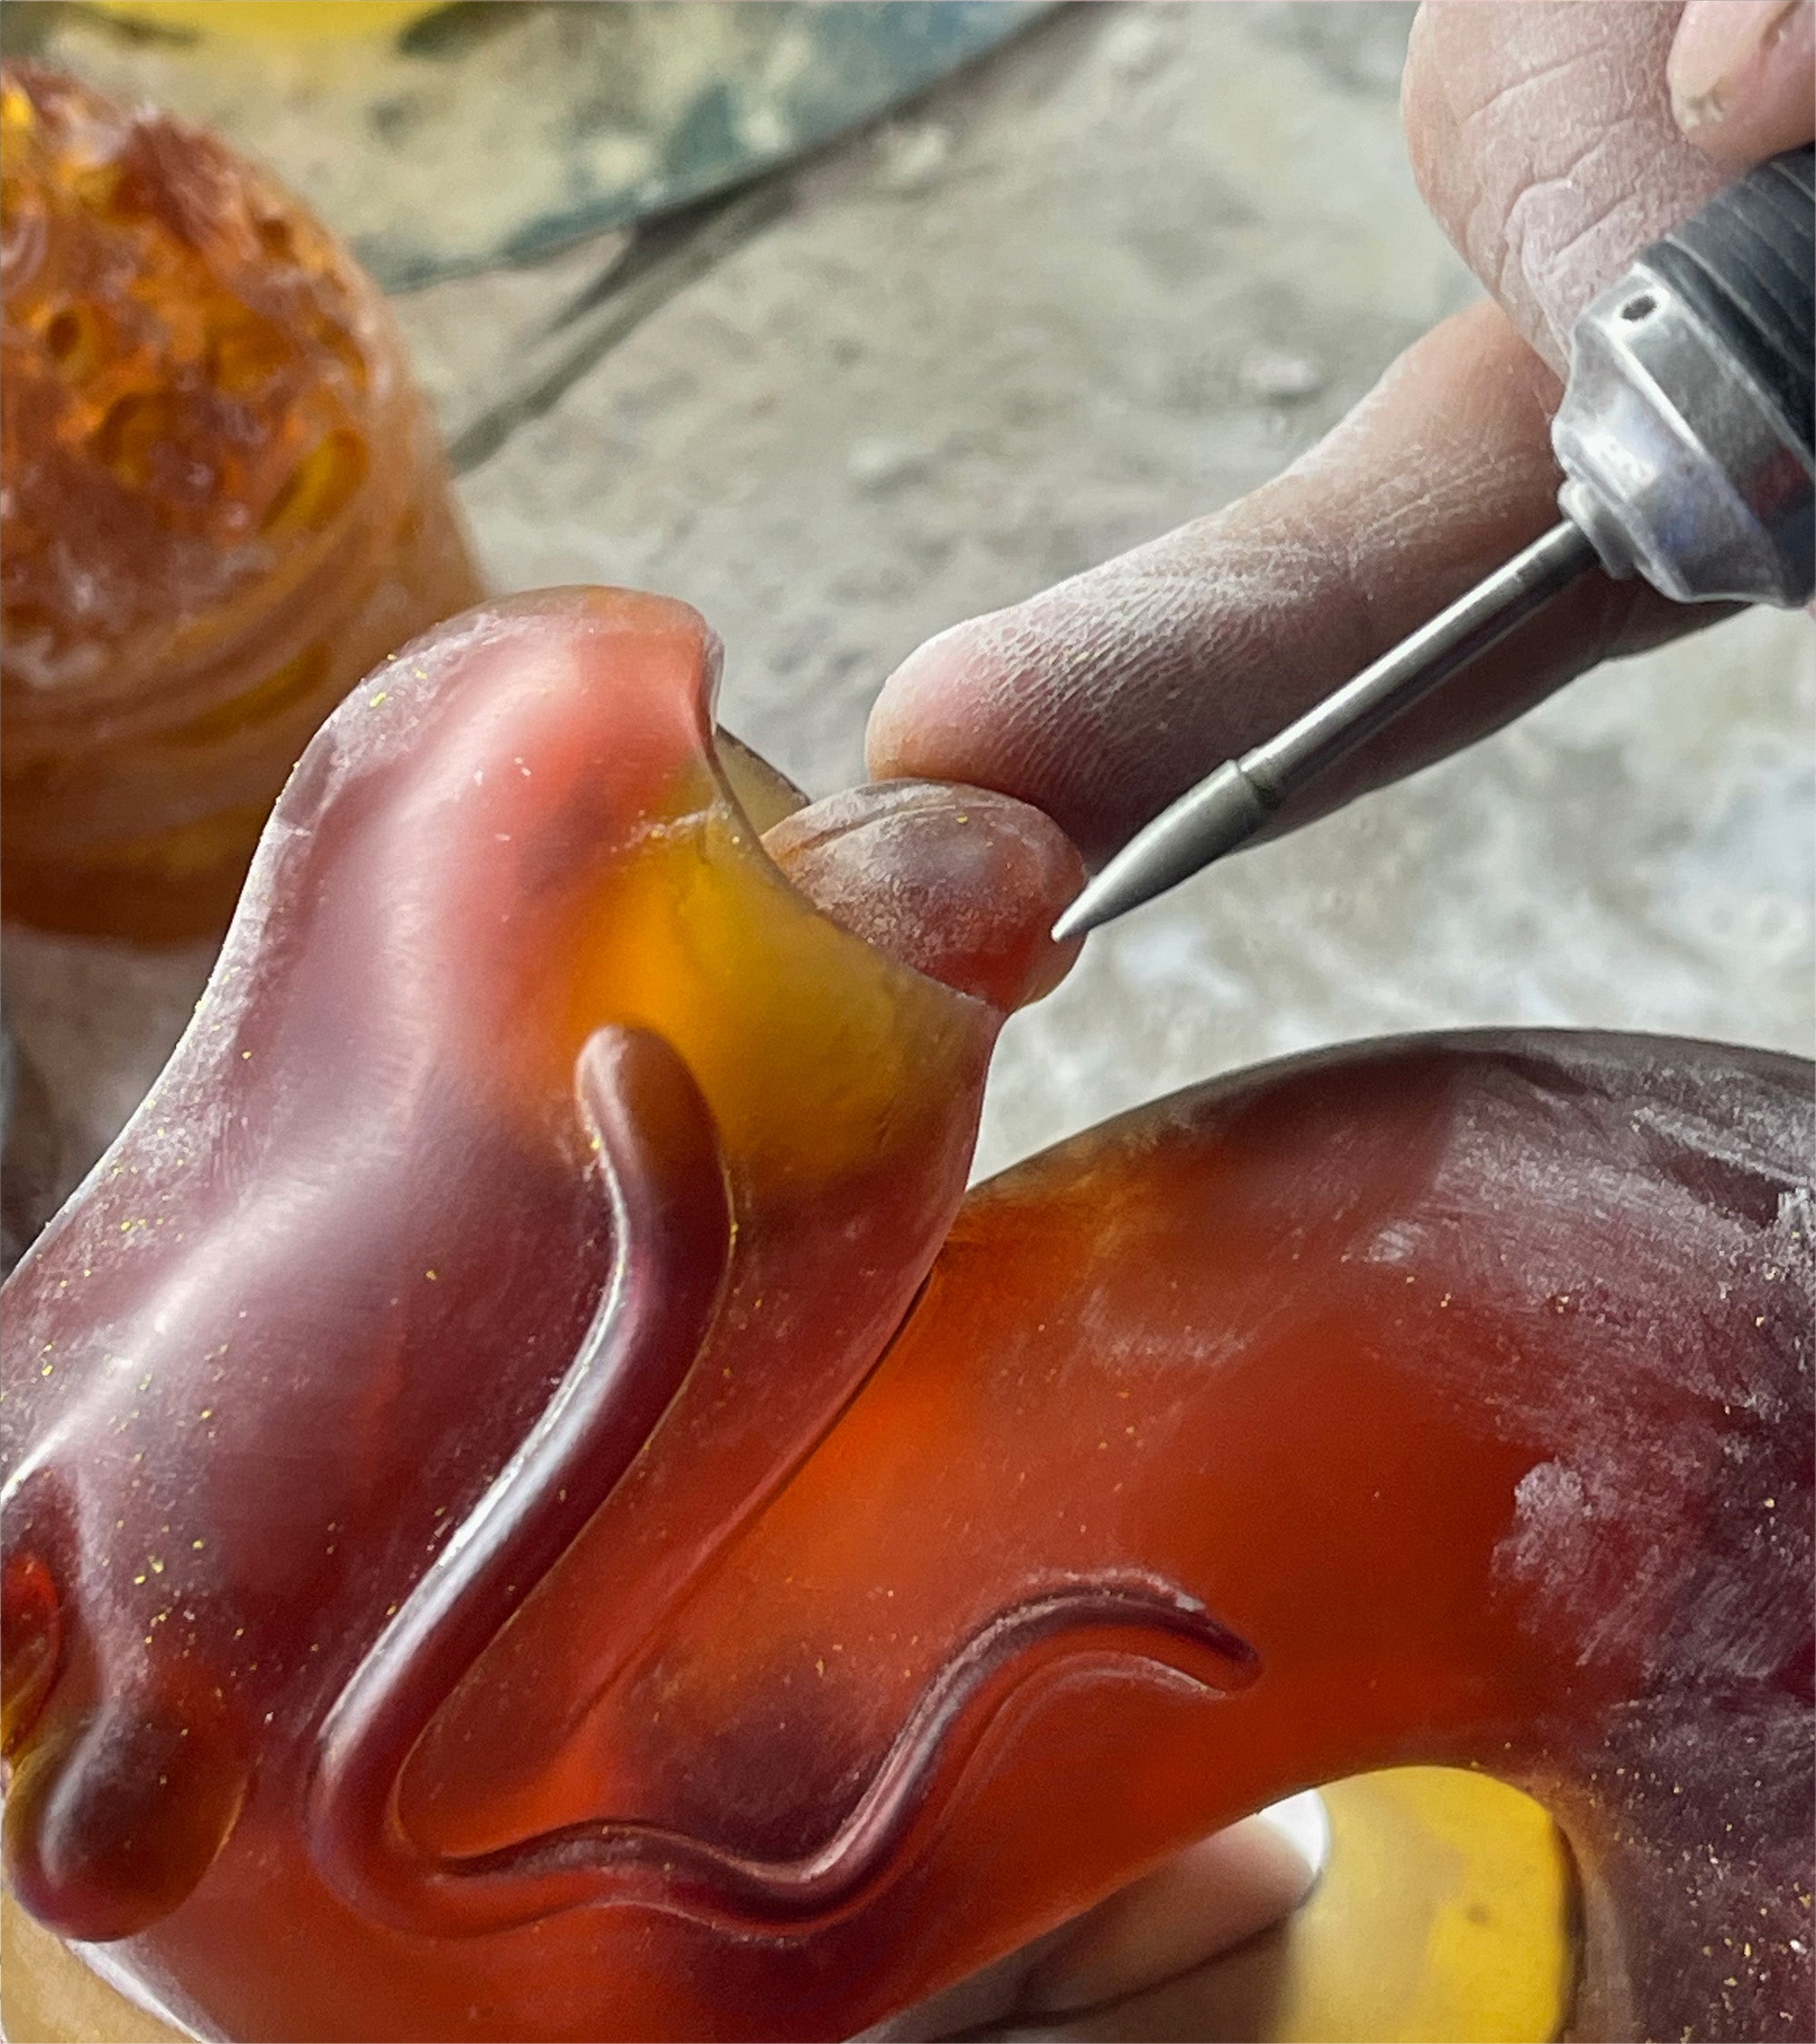
6) Refine the form
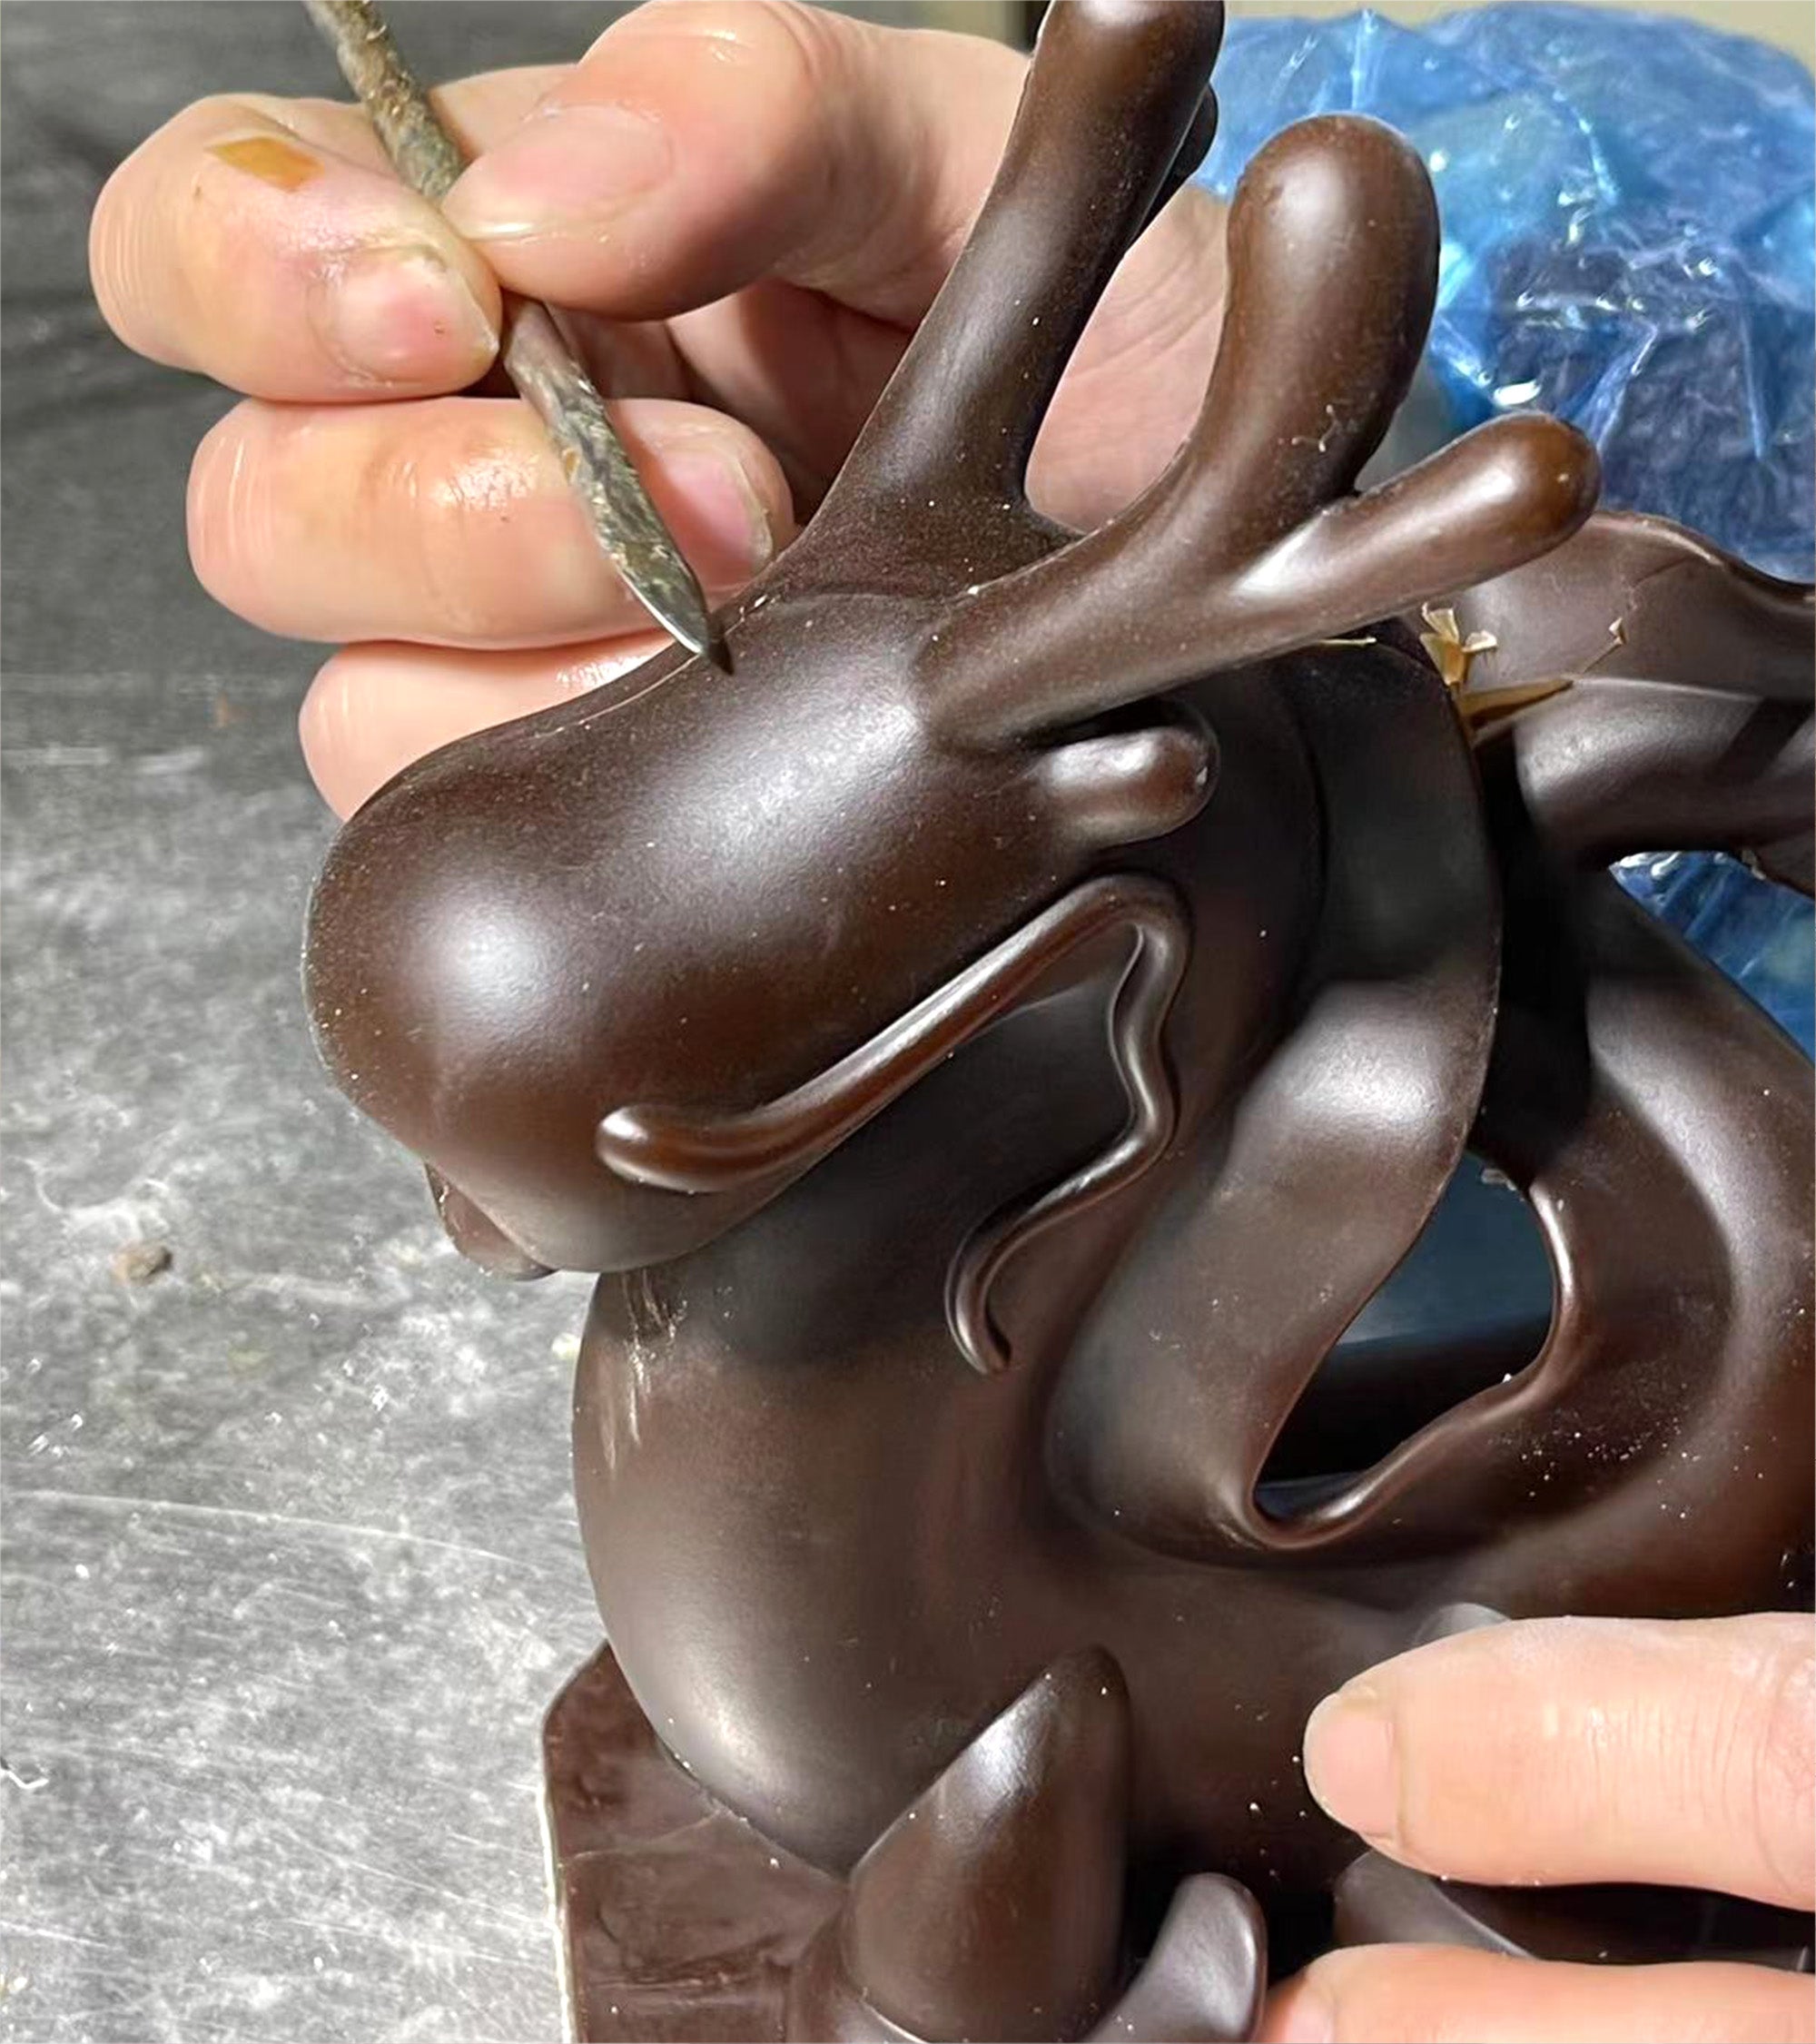
I cut off sprues, grind high points, and chase details with hand tools. I remove every trace of ceramic from creases and undercuts.
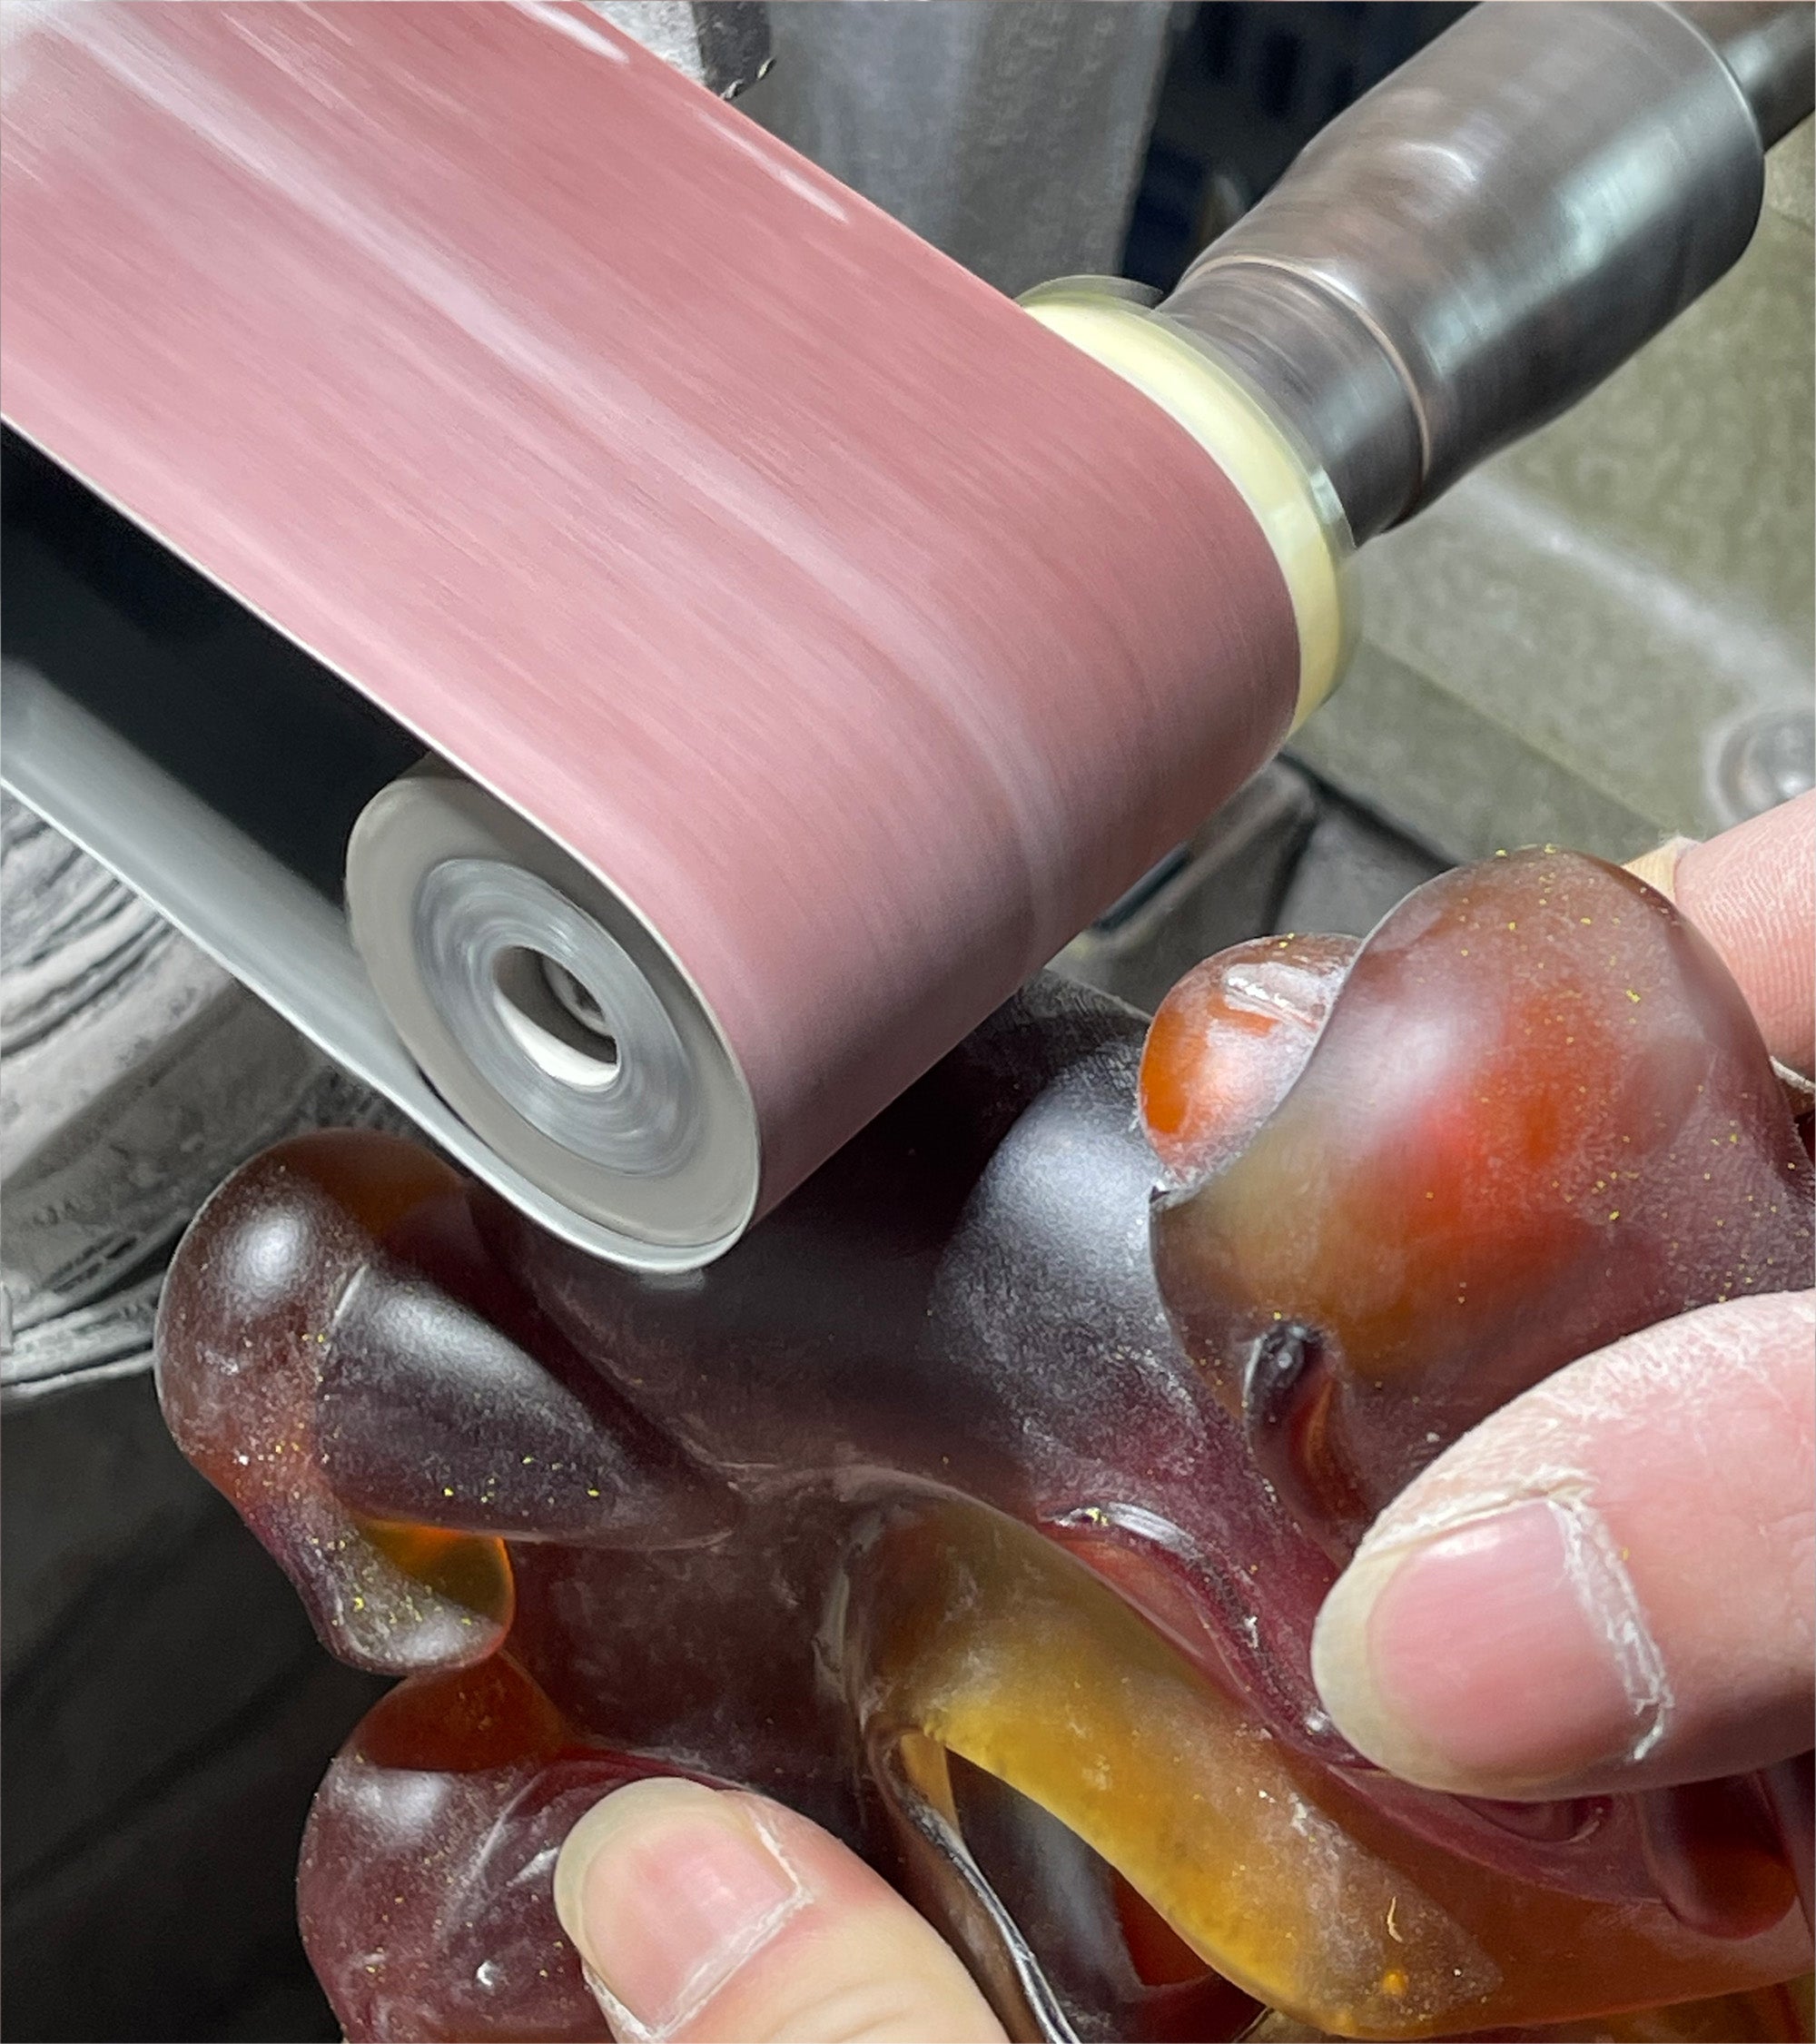
7) Sand, polish, and sandblast
I go through a long sequence of abrasives from coarse to fine. Some areas I bring to a soft polish. Others I sandblast for a matte, light-holding surface. The contrast gives the form life.
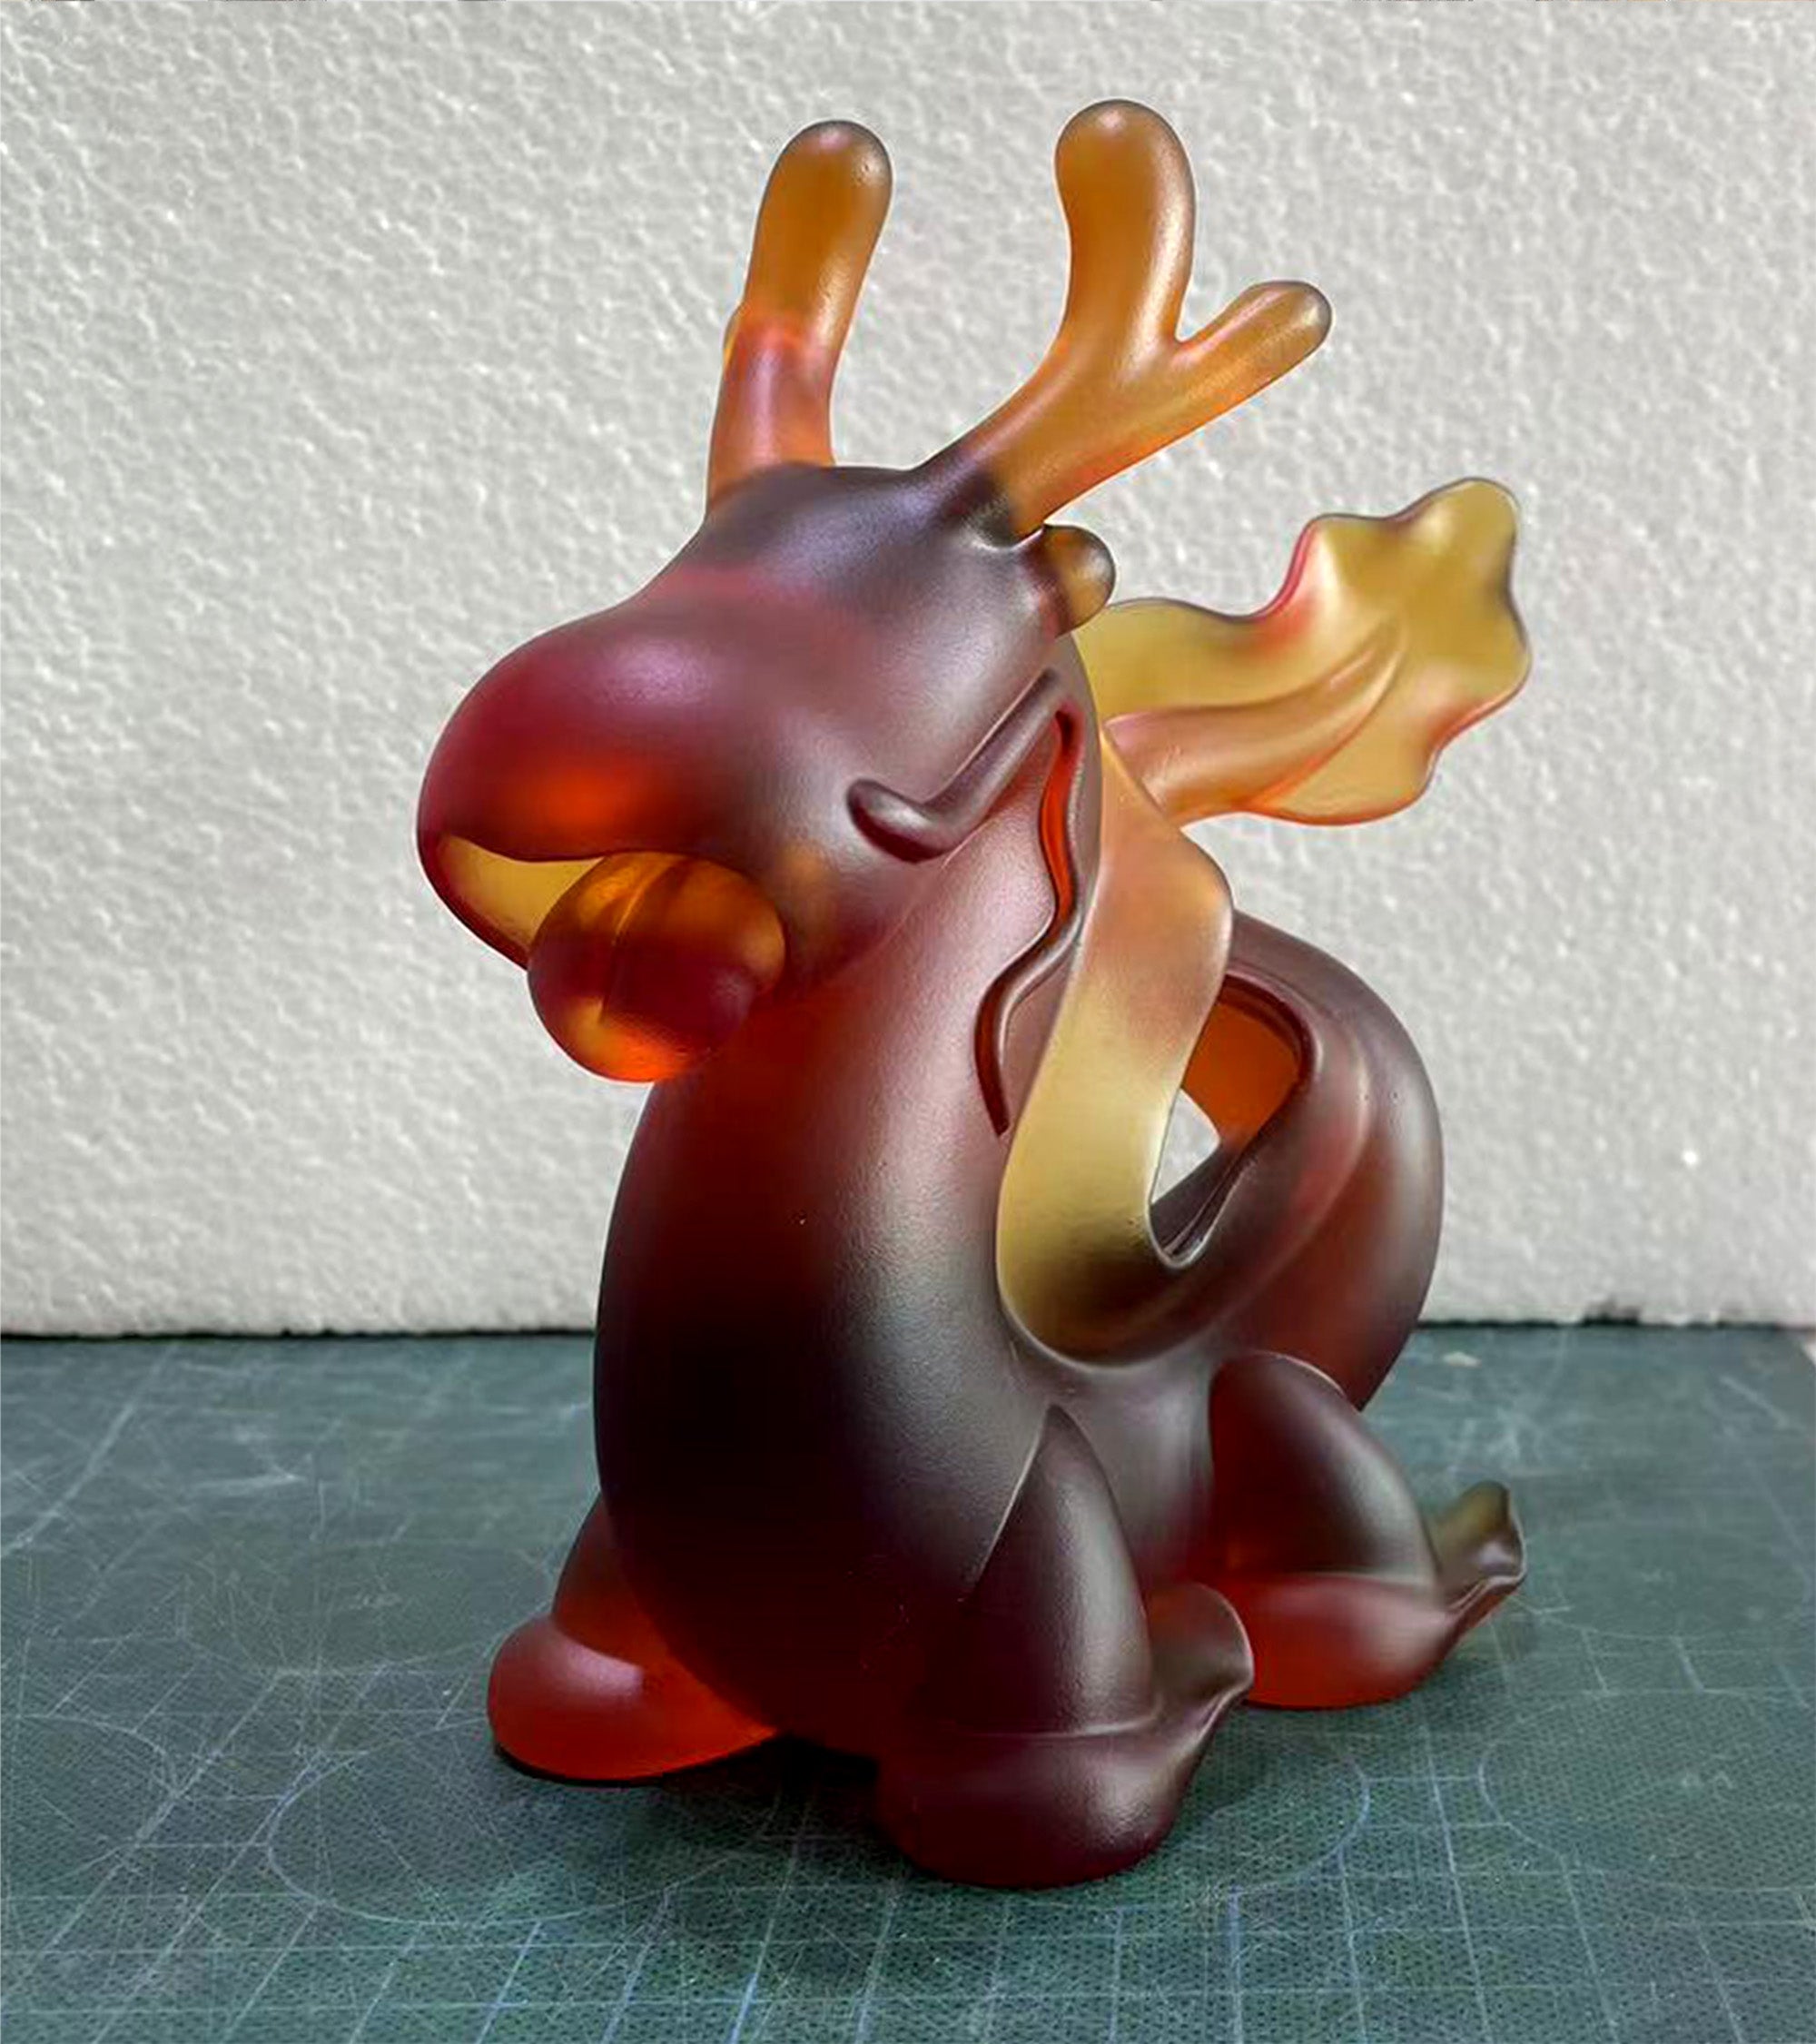
8) Final inspection
I inspect the piece under strong light, correct any defects, and sign it. Only then does it leave the studio.
- I design the sculpture digitally and make a 3D-printed prototype.
- A flexible mold is made from the prototype.
- A wax copy is cast from that mold and cleaned by hand.
- The wax is invested in a refractory ceramic mold.
- The wax is burned out, leaving an empty cavity.
- Measured lead-free crystal is loaded into the mold and fired in a kiln.
- The crystal is annealed and cooled slowly before de-molding.
- The rough casting is cut, ground, sandblasted, polished, inspected, and signed.
Lost-Wax Bronze and Cast Metal Works
Some metal sculptures can also be made through the lost-wax process, especially bronze and certain smaller cast metal works. The logic is related to crystal casting, but the material behaviour is very different.
A wax version of the sculpture is made from the prototype, then invested in a heat-resistant mold. The wax is burned out, leaving a cavity. Molten metal is then poured into that cavity. After cooling, the mold is broken away and the raw casting is cleaned, chased, welded if needed, ground, polished, or patinated.
With bronze, the final surface can be patinated, polished, or finished in different tones. Bronze has its own language: warmer, older, more traditional, and often more visibly connected to the history of sculpture.
With stainless steel, the finishing can be much more demanding because the surface may need to be taken through many stages of grinding and polishing before it reads as clean, reflective metal.
This is different from my large stainless-steel sculptures, which are usually fabricated from shaped stainless-steel sheets rather than cast in one piece.
Steps

3D print prototype model
The process begins with a prototype of the sculpture. This stage is used to resolve the form, proportions, and character before moving into casting. In this case, the sculpture already carries the full gesture of the final piece, but it is still only the starting point for what will become metal.

Wax copy model
A wax version of the sculpture is made from the prototype. This wax stage is essential to the lost-wax casting process, because it becomes the exact form that will later be replaced by molten metal. At this point the sculpture still looks soft and handmade, but it already contains the final surface, contours, and details.
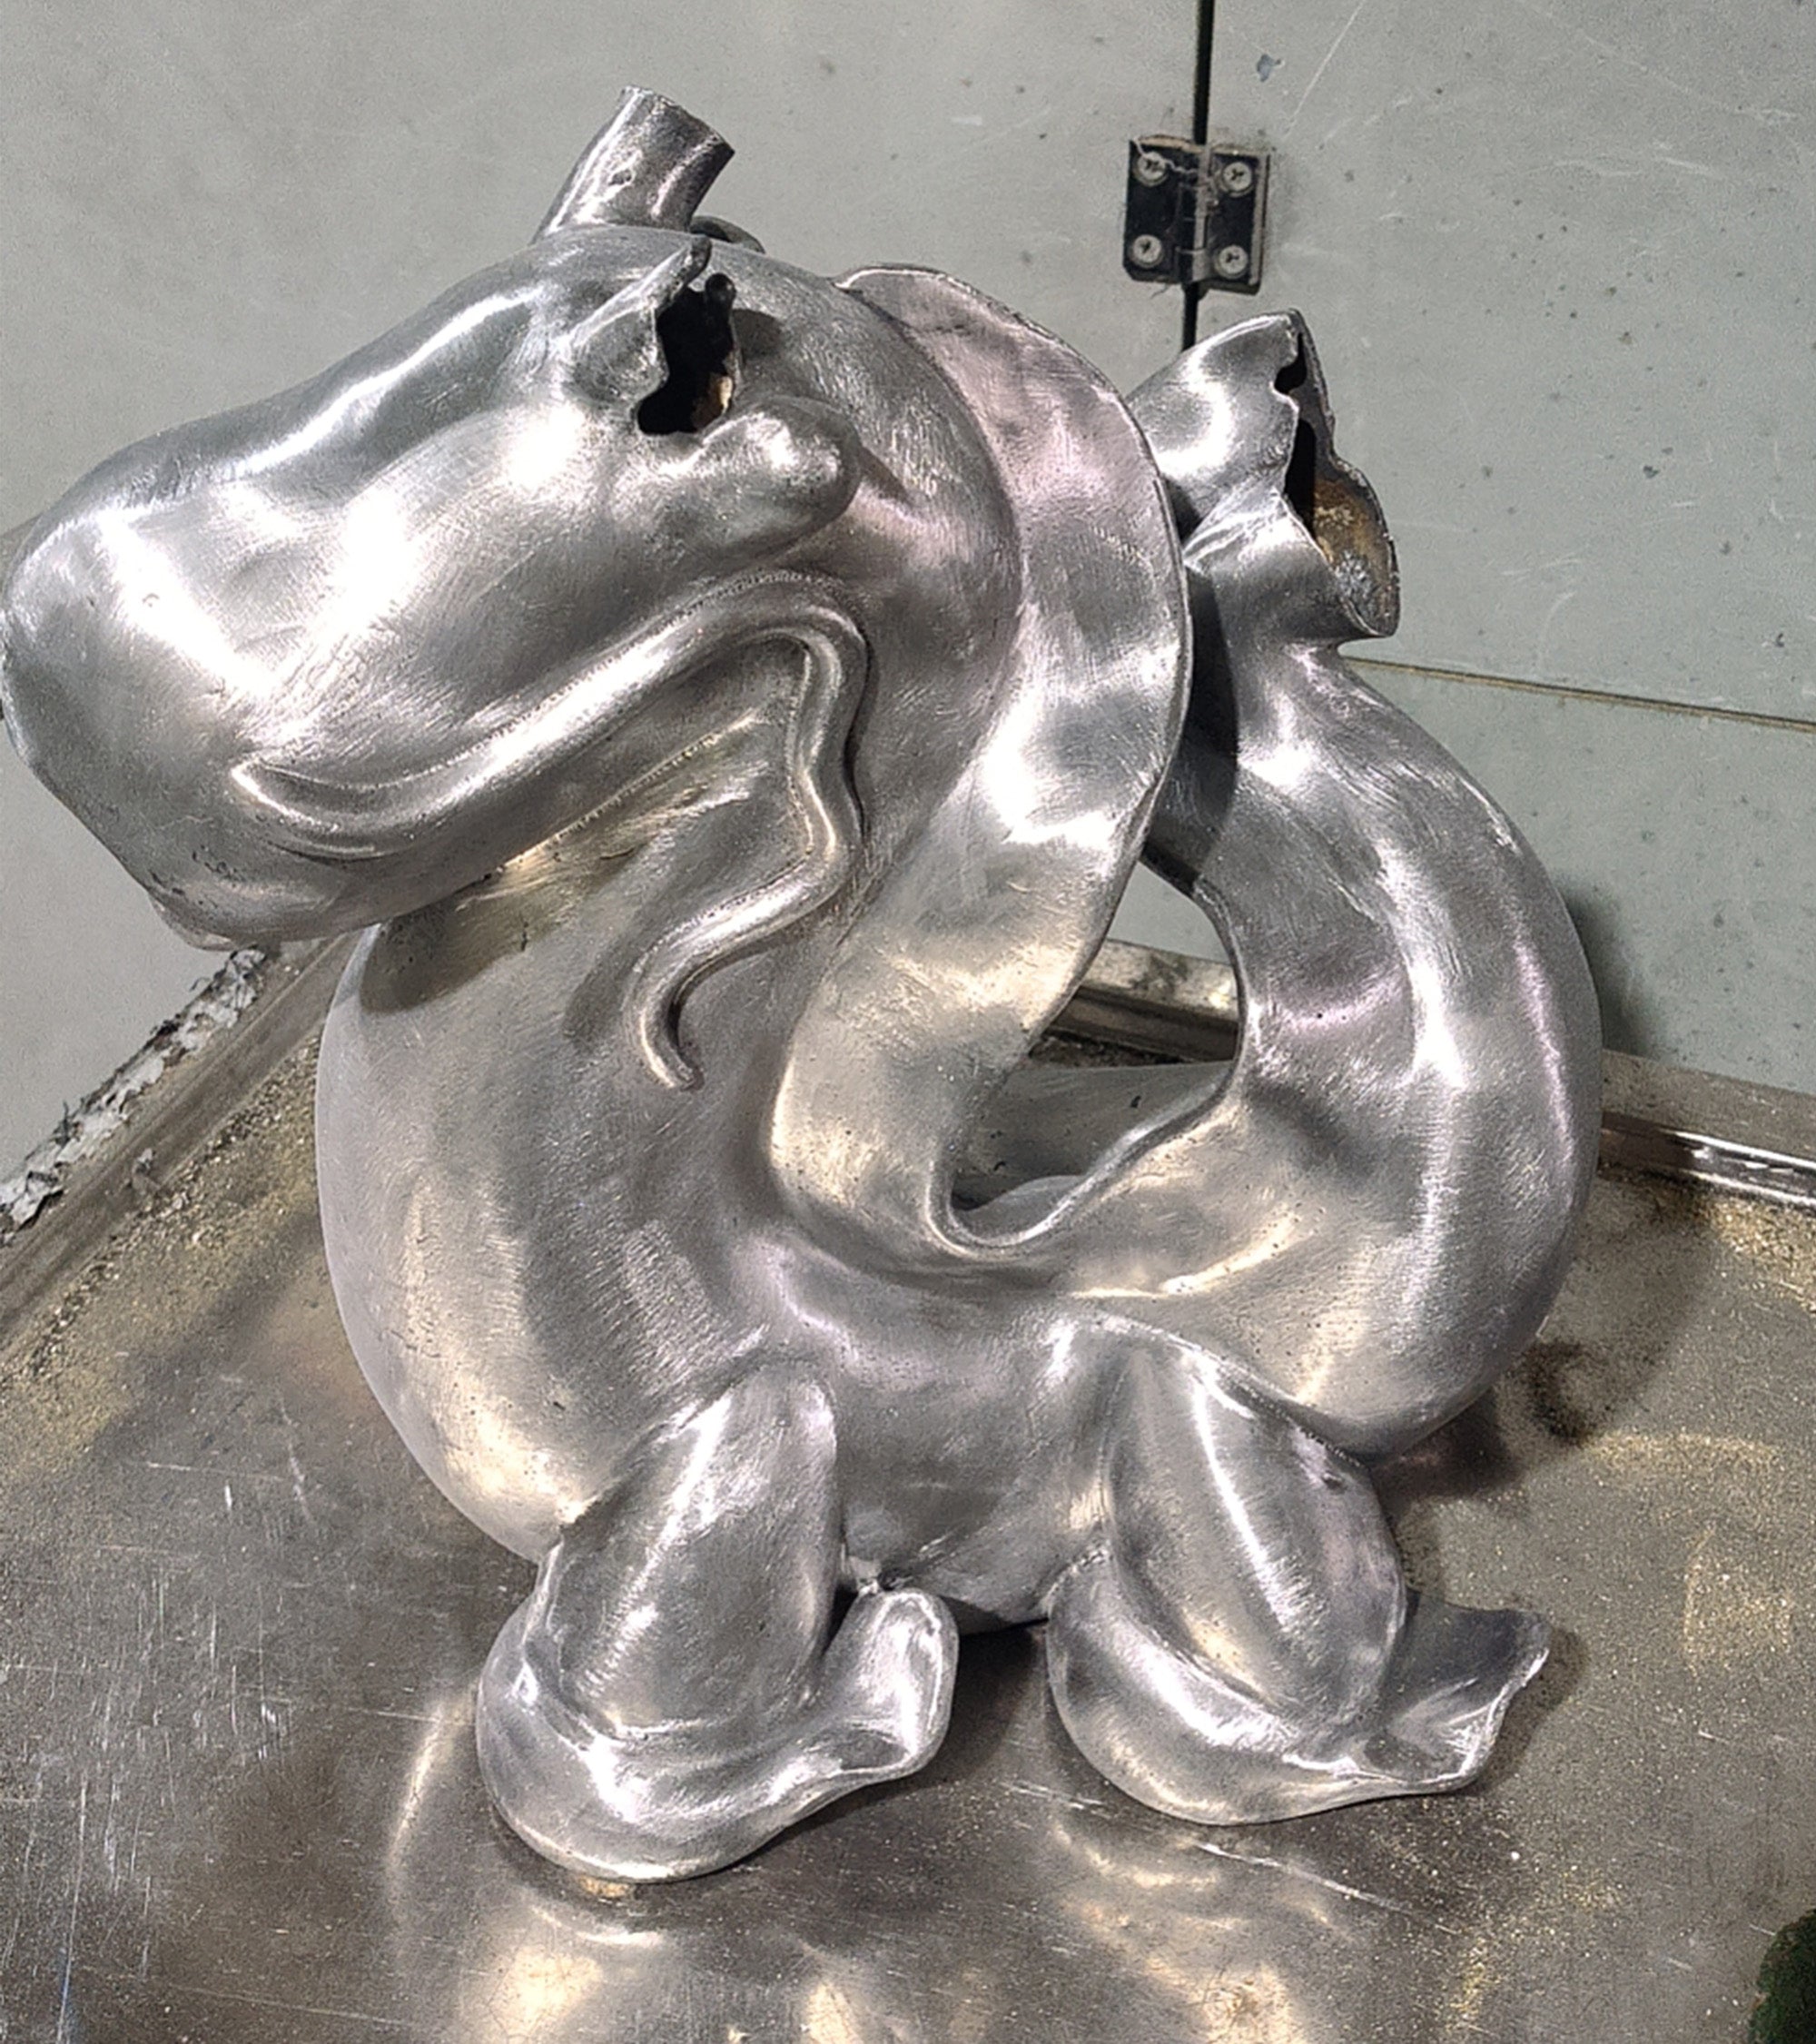
Stainless steel raw metal casting
After the wax is invested in a heat-resistant mold and burned out, molten metal is poured into the empty cavity. Once the metal cools, the mold is broken away to reveal the raw casting. At this stage the sculpture is still unfinished, with a rougher surface and visible casting marks, but the full form is now present in metal.
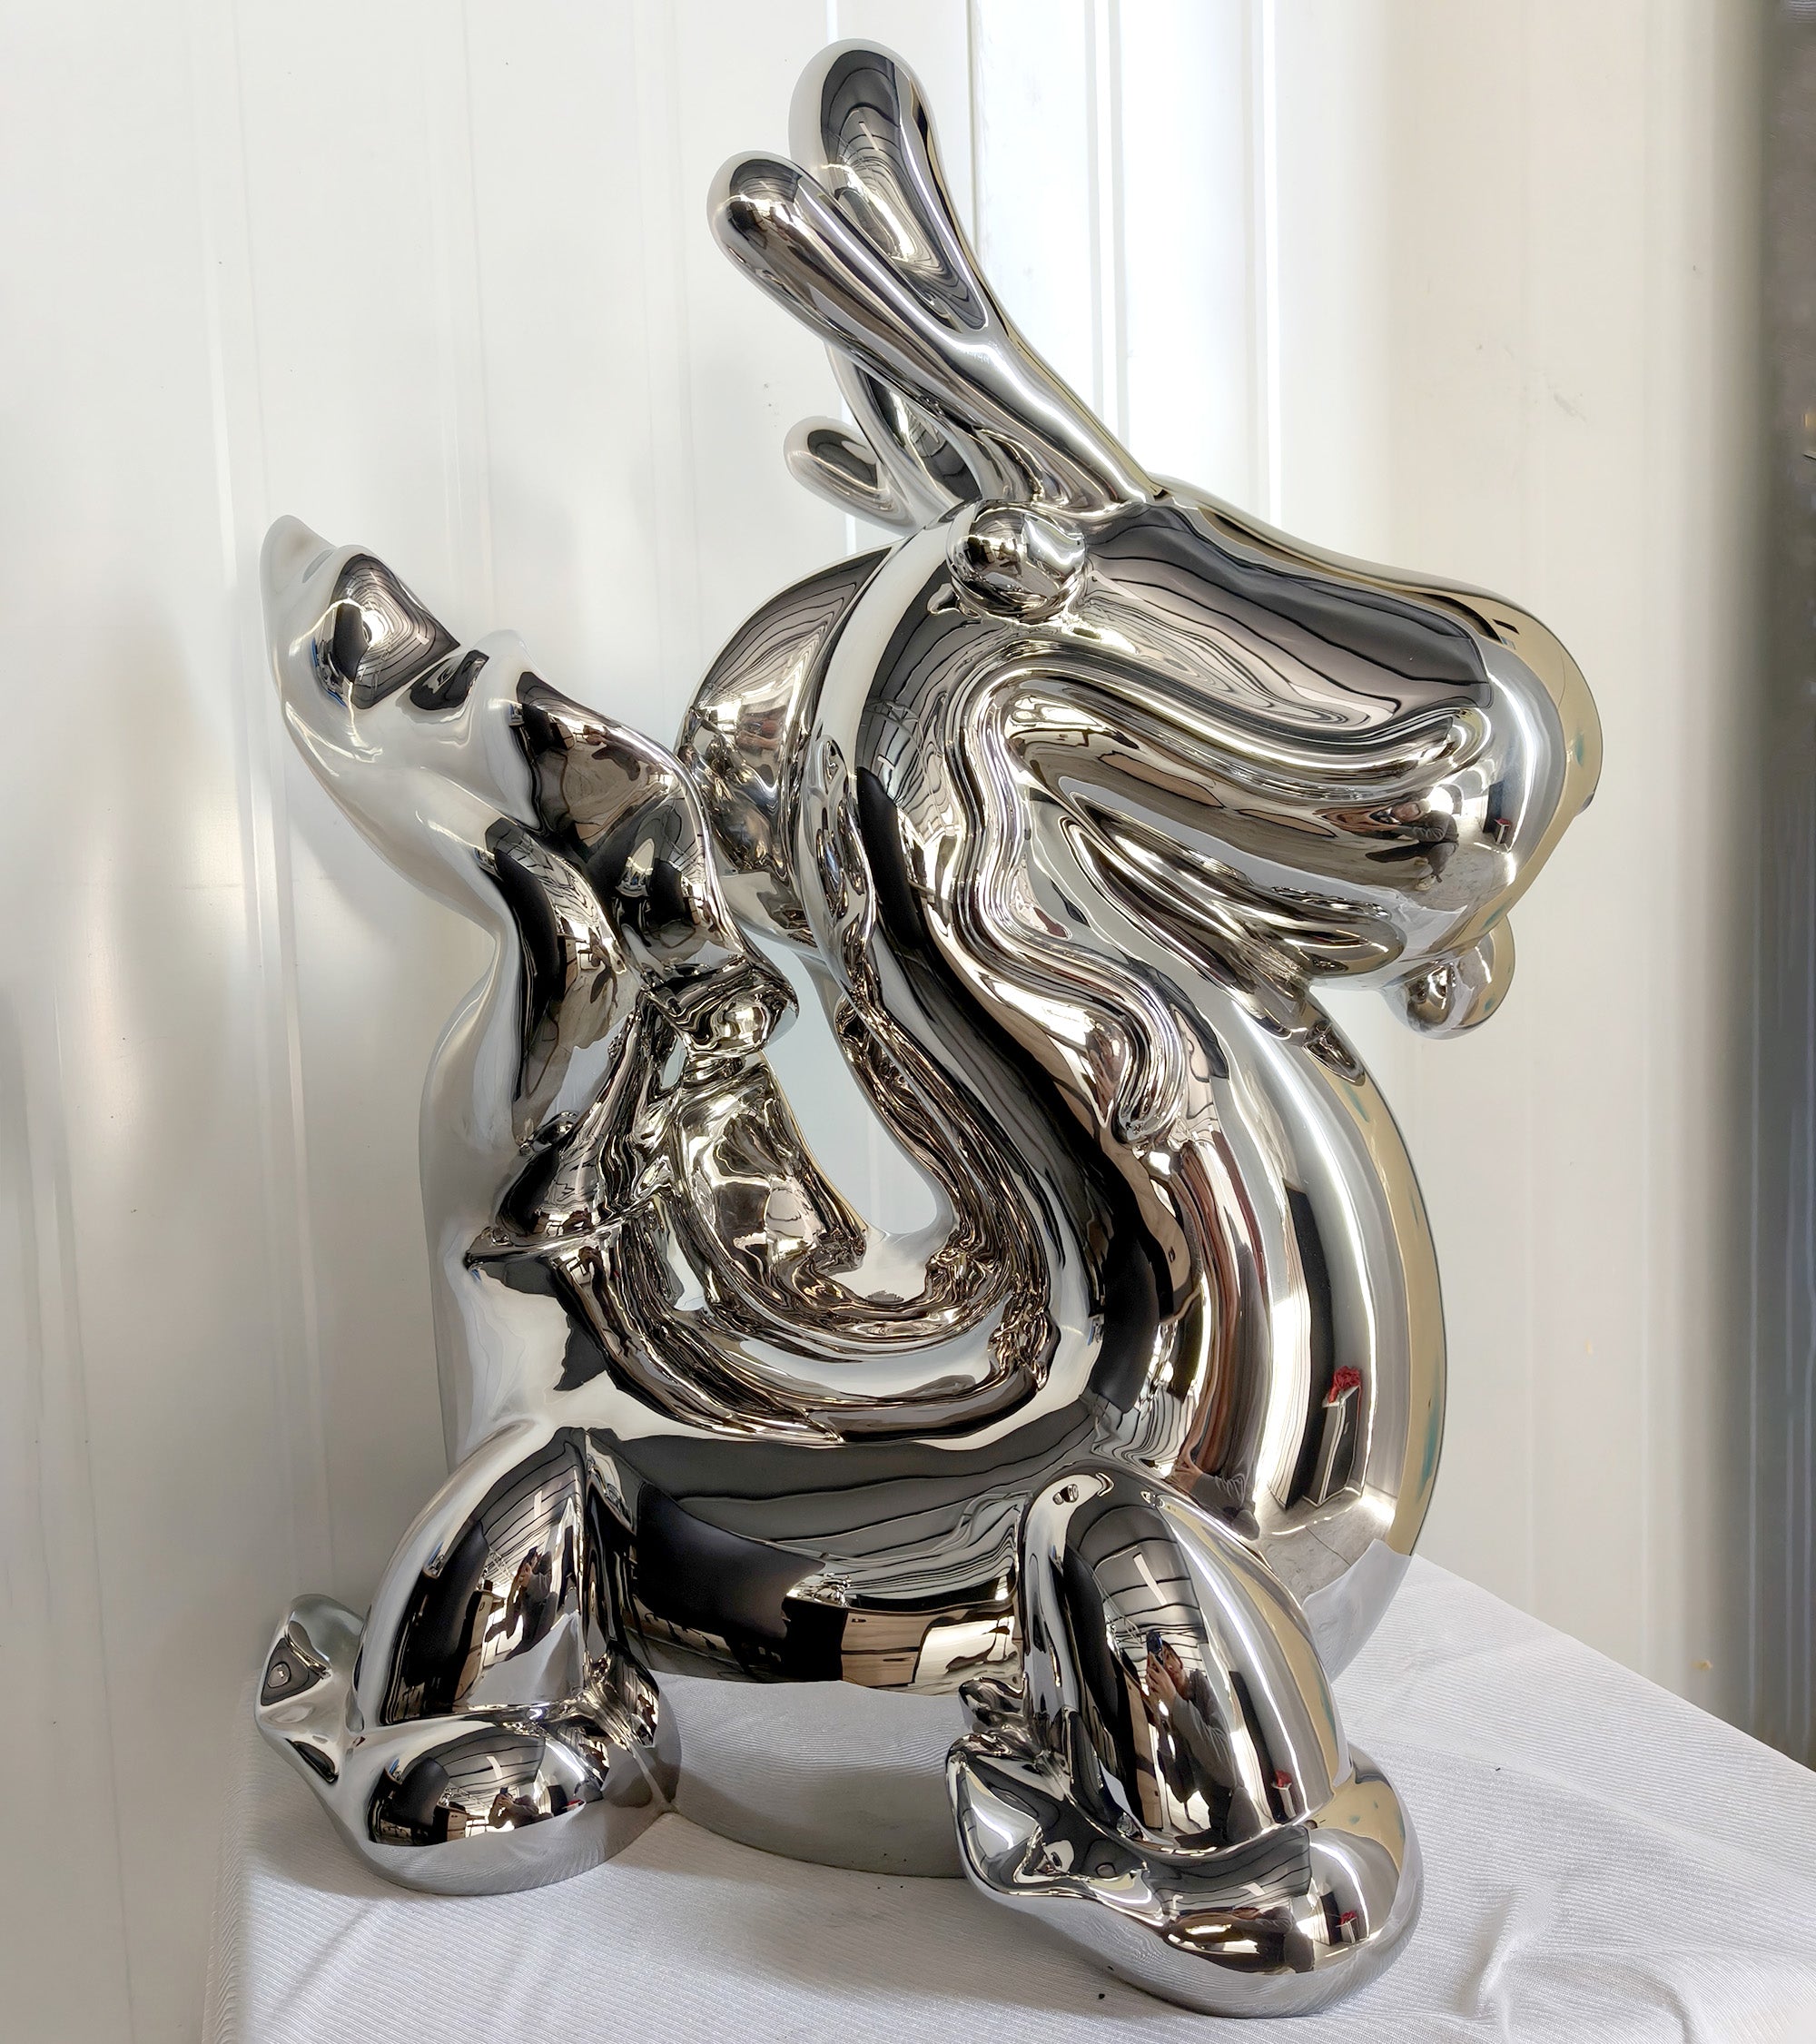
Finished polished sculpture
The cast metal sculpture is then cleaned, refined, ground, and polished until it reaches its final finish. This completed piece has a reflective stainless-steel surface that gives the form a crisp, fluid presence. Unlike my large stainless-steel sculptures, which are usually fabricated from shaped sheet metal, works like this can be made through the lost-wax casting process.
- I design the sculpture digitally and make a prototype or maquette.
- A mold is made from the prototype.
- A wax copy is created and refined by hand.
- The wax is invested in a heat-resistant mold.
- The wax is burned out to leave a hollow cavity.
- Molten bronze or another suitable metal is poured into the mold.
- The casting cools and the mold is broken away.
- The raw casting is chased, welded if needed, ground, polished, patinated, and inspected.
Large Stainless-Steel Sculptures
My large stainless-steel sculptures are not usually cast like bronze. They are fabricated from sheet metal, which means the final form is built from many shaped pieces that have to become one continuous body.
The process often begins with the digital sculpture being divided into workable sections. Those sections become templates, panels, and marked parts in the workshop. Flat stainless-steel sheet is cut, hammered, rolled, pressed, or panel-beaten into curved forms. At this stage the pieces can look almost crude: marked with guide lines, covered in scratches, full of heat stains, and still visibly separate from each other.
That ugly stage is important. It is where the sculpture is still revealing how it was made.
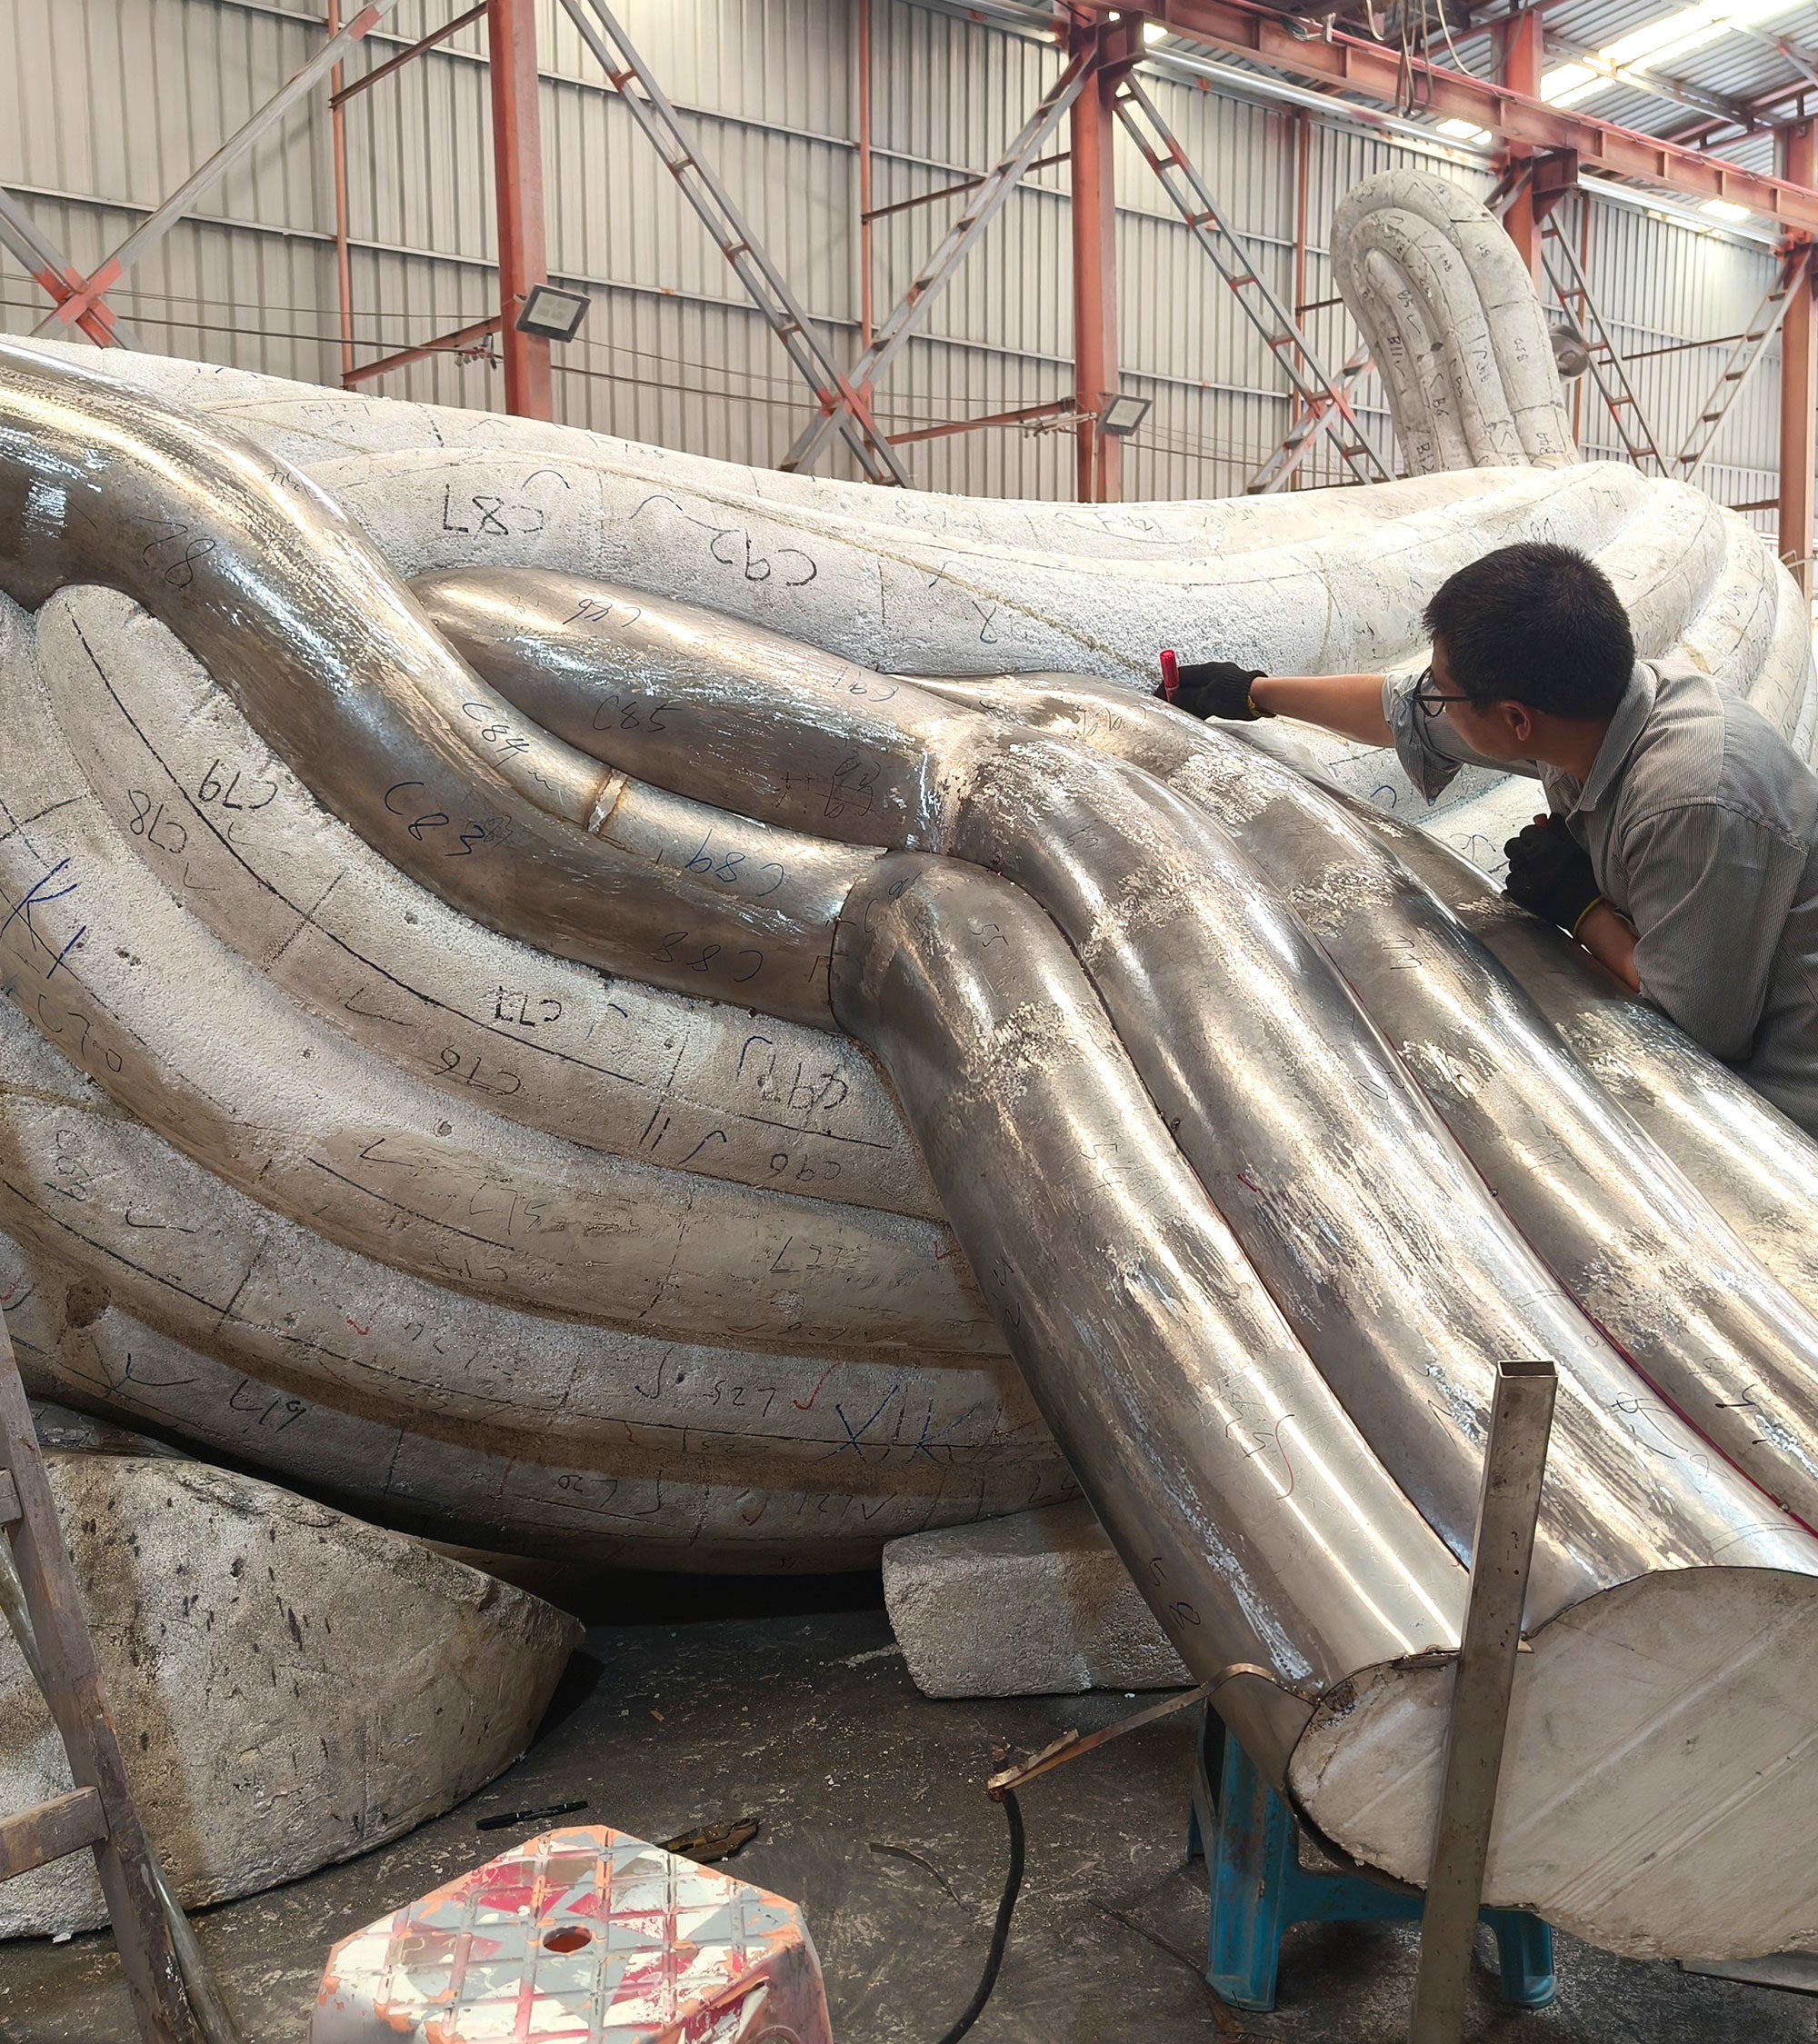
The shaped panels are then test-fitted like a three-dimensional puzzle. They are tack-welded, adjusted, welded more fully, ground back, and checked again. A curve that looks smooth on the computer has to be forced into real metal by hand. If the panel moves from heat, if a seam pulls, or if the shape loses tension, it has to be corrected before the next stage can work.
After welding, the surface goes through a long sequence of grinding, sanding, and polishing. The seams are reduced until they stop reading as joins. The surface moves from rough fabrication marks to a dull satin finish, then through finer and finer stages until the stainless steel becomes reflective.
A mirror finish is not a coating. It is the result of removing scratches until the metal can hold the world clearly.
I use different grades of stainless steel depending on the finish and location. 304 stainless steel can be used for certain colour-finished or painted editions. 316 stainless steel is preferred for mirror-polished works because it gives a cleaner, more durable surface. For outdoor works, coastal environments, or heavy-weather public sculpture, 316L stainless steel is usually the better choice because of its stronger corrosion resistance.
This is one reason I often prefer stainless steel over bronze. Bronze has its own beauty, but it usually holds more surface irregularity. Stainless steel can be polished to a level of clarity that suits the precision of my digital forms. The mirror surface is not just decorative. It pulls the viewer into the sculpture. You are literally reflected in the animal, which makes the emotional read harder to keep at a distance.
Stainless steel also has a practical advantage for long-term public work: it is durable, repairable, corrosion-resistant when the right grade is chosen, and recyclable.
This is why stainless steel suits my work. It is industrial, heavy, and stubborn, but after enough labour it can look inflated, fluid, and almost weightless. The material begins as hard sheet metal and ends as a reflective skin. It catches the sky, trees, buildings, people, and weather. A polished stainless-steel sculpture is never only itself. It borrows the world around it and pulls that world onto its surface.
That matters especially in public sculpture. A large stainless-steel work changes throughout the day. Morning light, rain, clouds, nearby architecture, and the movement of people all become part of the piece. The sculpture does not sit quietly in a space. It keeps negotiating with the space.
There is a contradiction in that, and I like contradictions. Stainless steel says permanence, industry, and weight. My forms often want to suggest breath, movement, animals, and a slightly ridiculous sense of life. The work becomes interesting when those two things are both true.
Steps
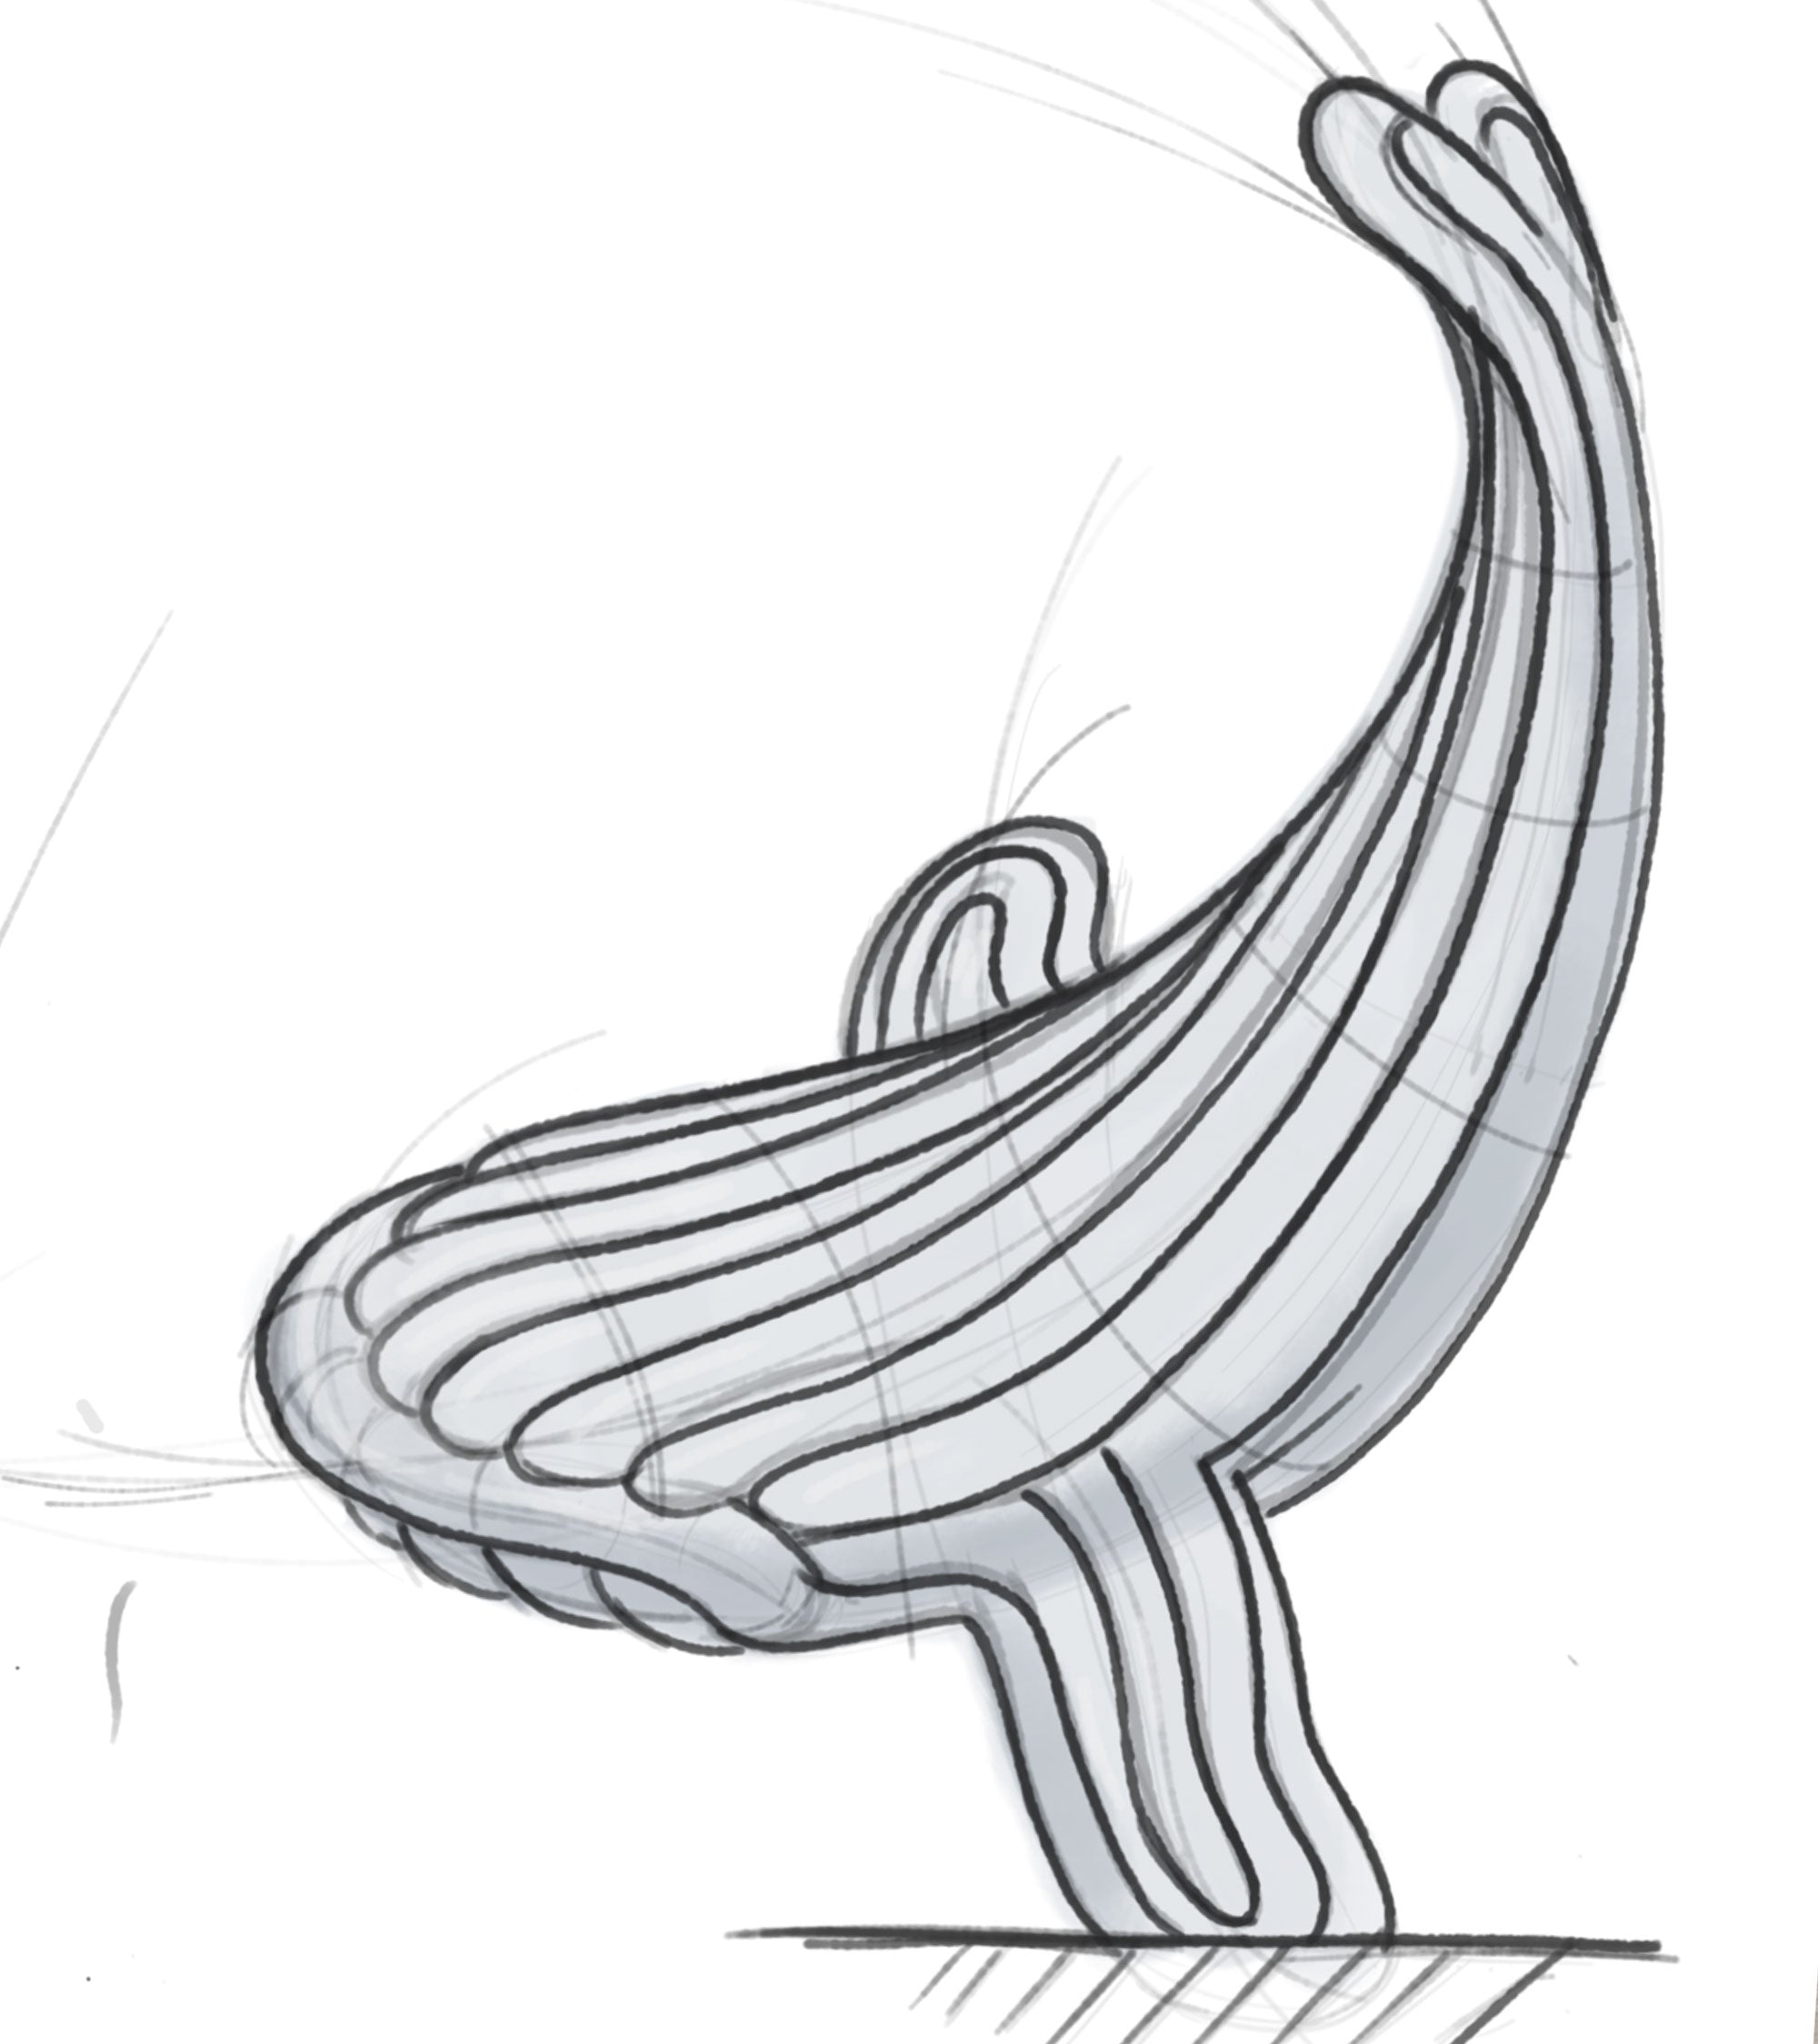
1. Digital sketch and design direction
A loose digital sketch showing the early idea for the sculpture. At this stage, the form is still being searched for: the flow, balance, posture, and movement are worked out before the sculpture becomes metal. The drawing already shows the long sweeping body, raised tail, and ribbed surface that will later become a large stainless-steel form.
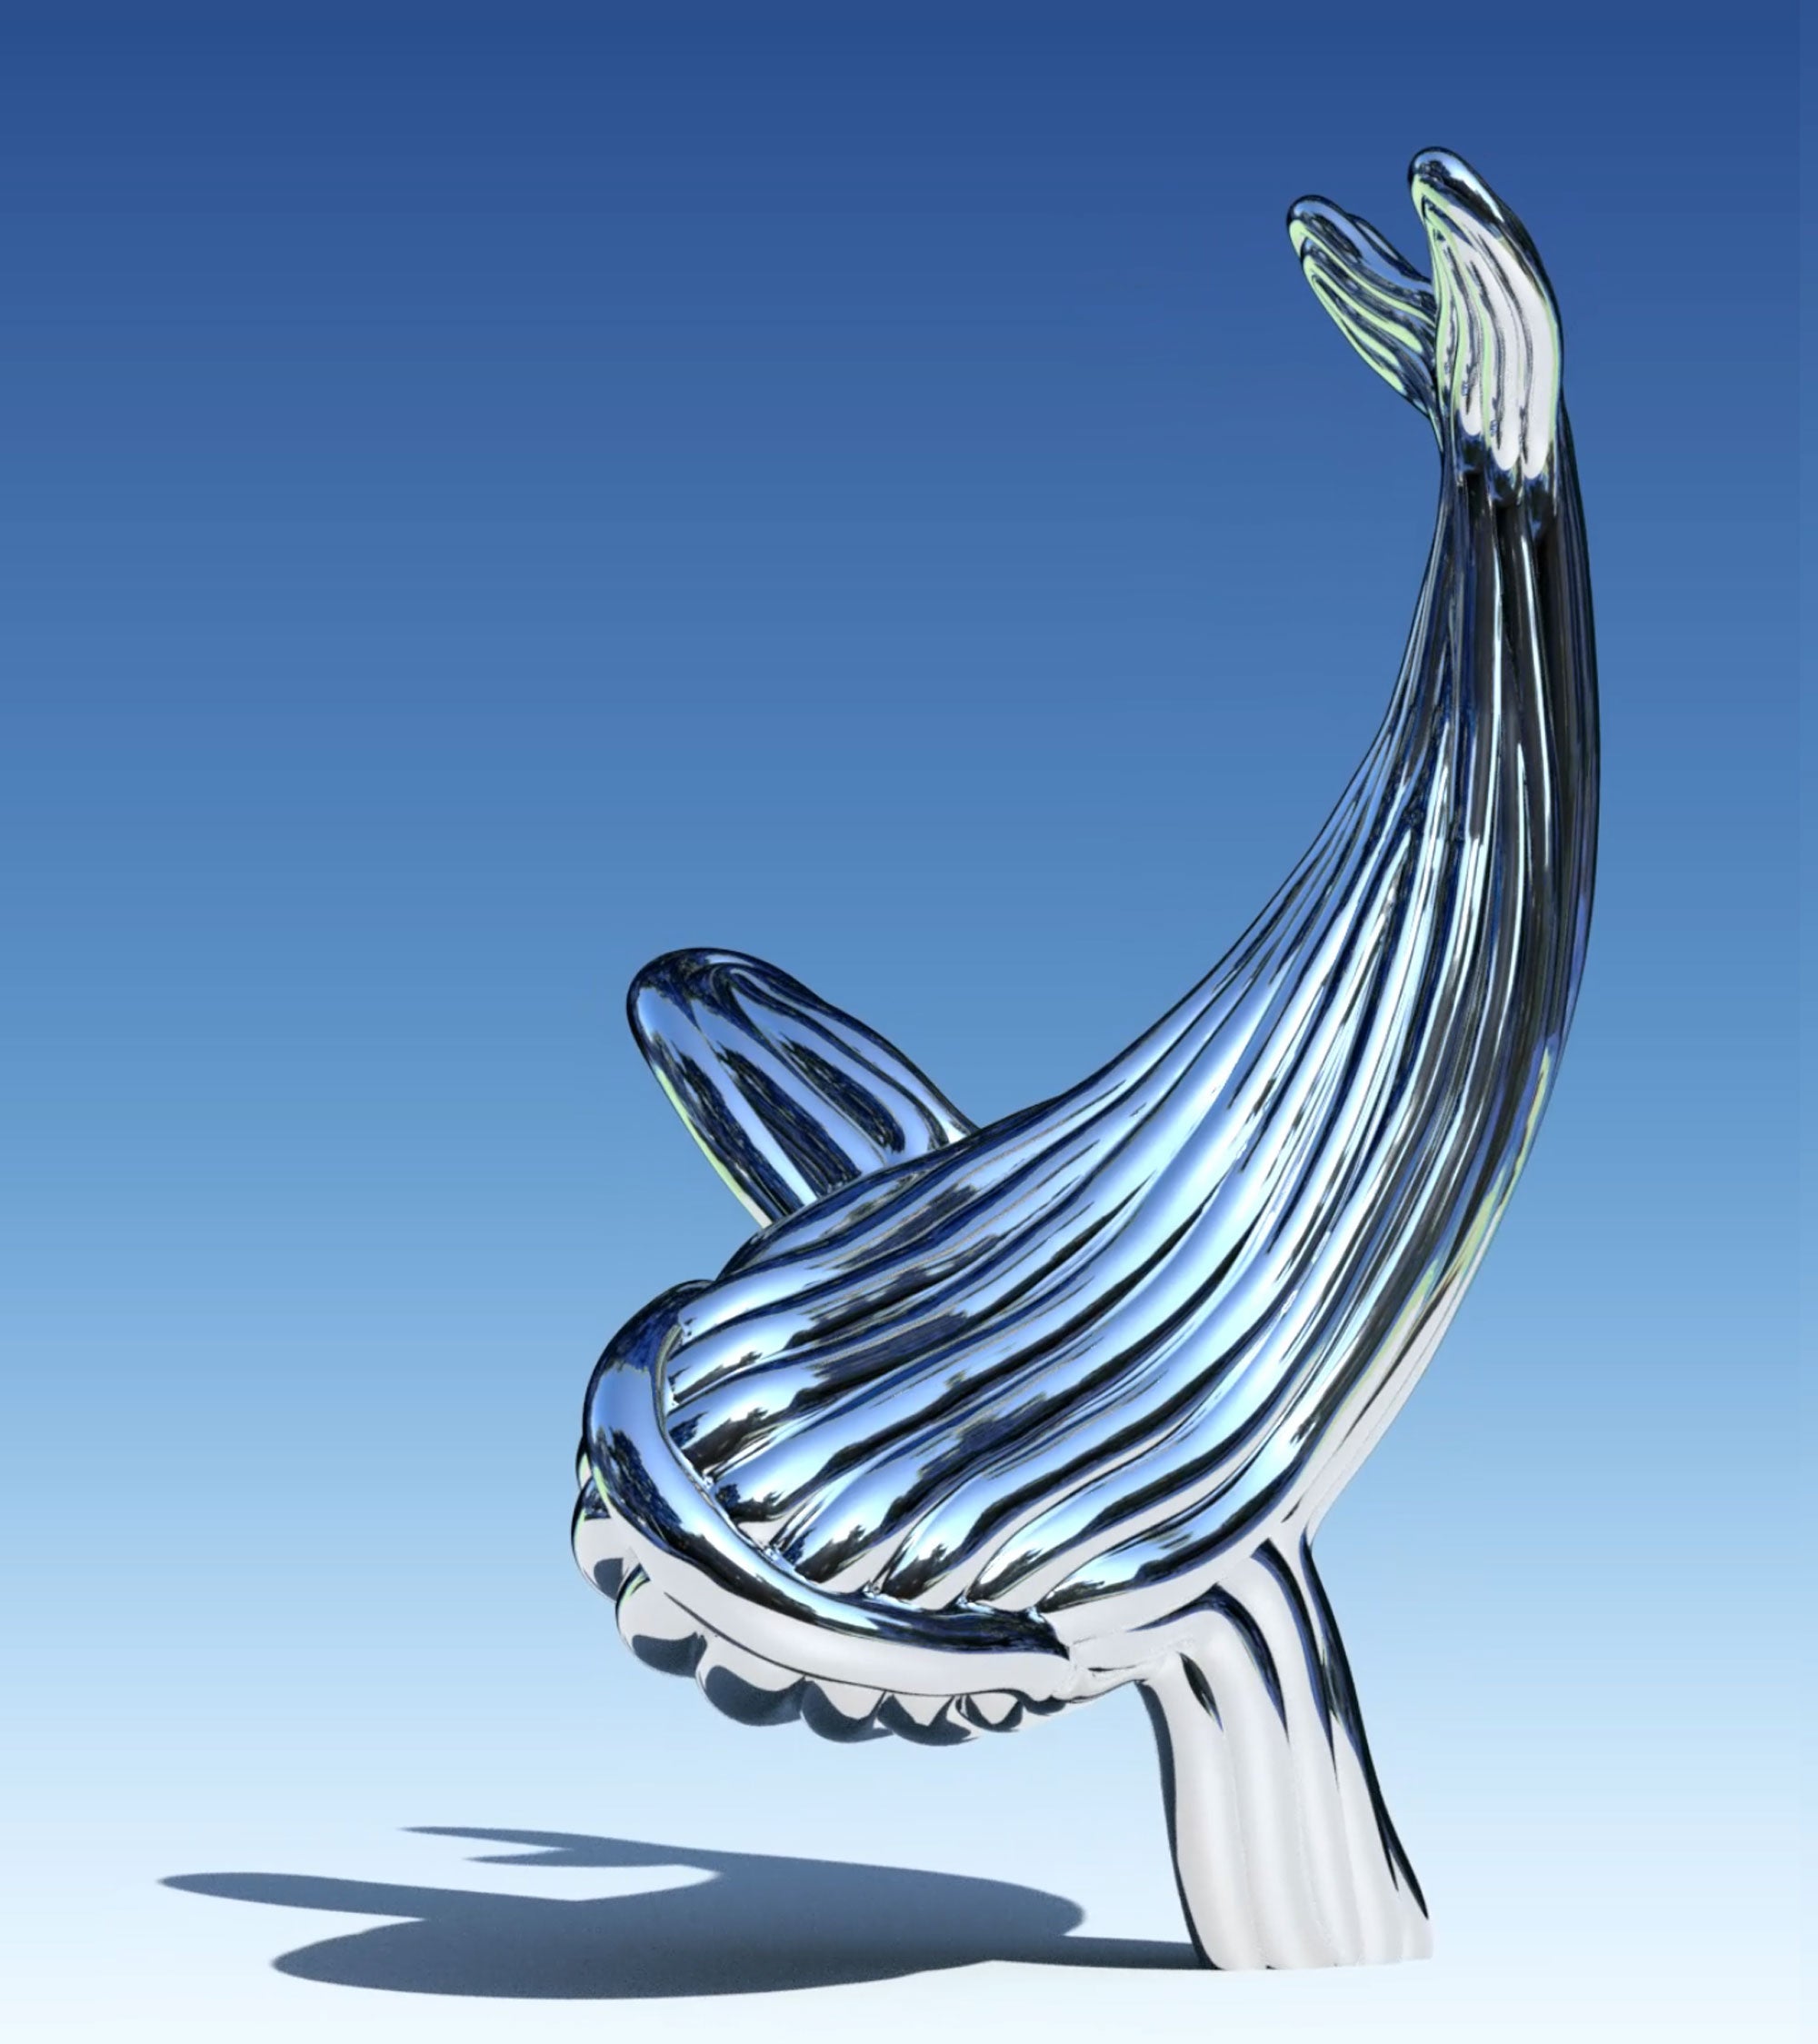
2. 3D render preview
A 3D render preview of the sculpture before fabrication. This image shows the intended final direction: a highly polished stainless-steel surface, a sweeping upward movement, and a form that feels light despite its scale. The render helps test the silhouette, reflections, proportions, and emotional character of the piece before the work moves into full-size foam modelling and metal fabrication.

3. Full-size foam model in the workshop
The sculpture begins as a full-scale foam model, enlarged from the digital design. This white form allows the workshop team to understand the volume, curves, proportions, and balance before the stainless-steel panels are made. It looks soft and almost inflatable here, but it is already becoming the guide for something much harder and heavier.

4. Marking sections and panel templates
The foam model is divided into numbered sections. Each marked area becomes a guide for cutting and shaping stainless-steel sheet. This is where the sculpture starts turning into a three-dimensional puzzle, with every panel needing to fit the form, the neighbouring pieces, and the overall curve.
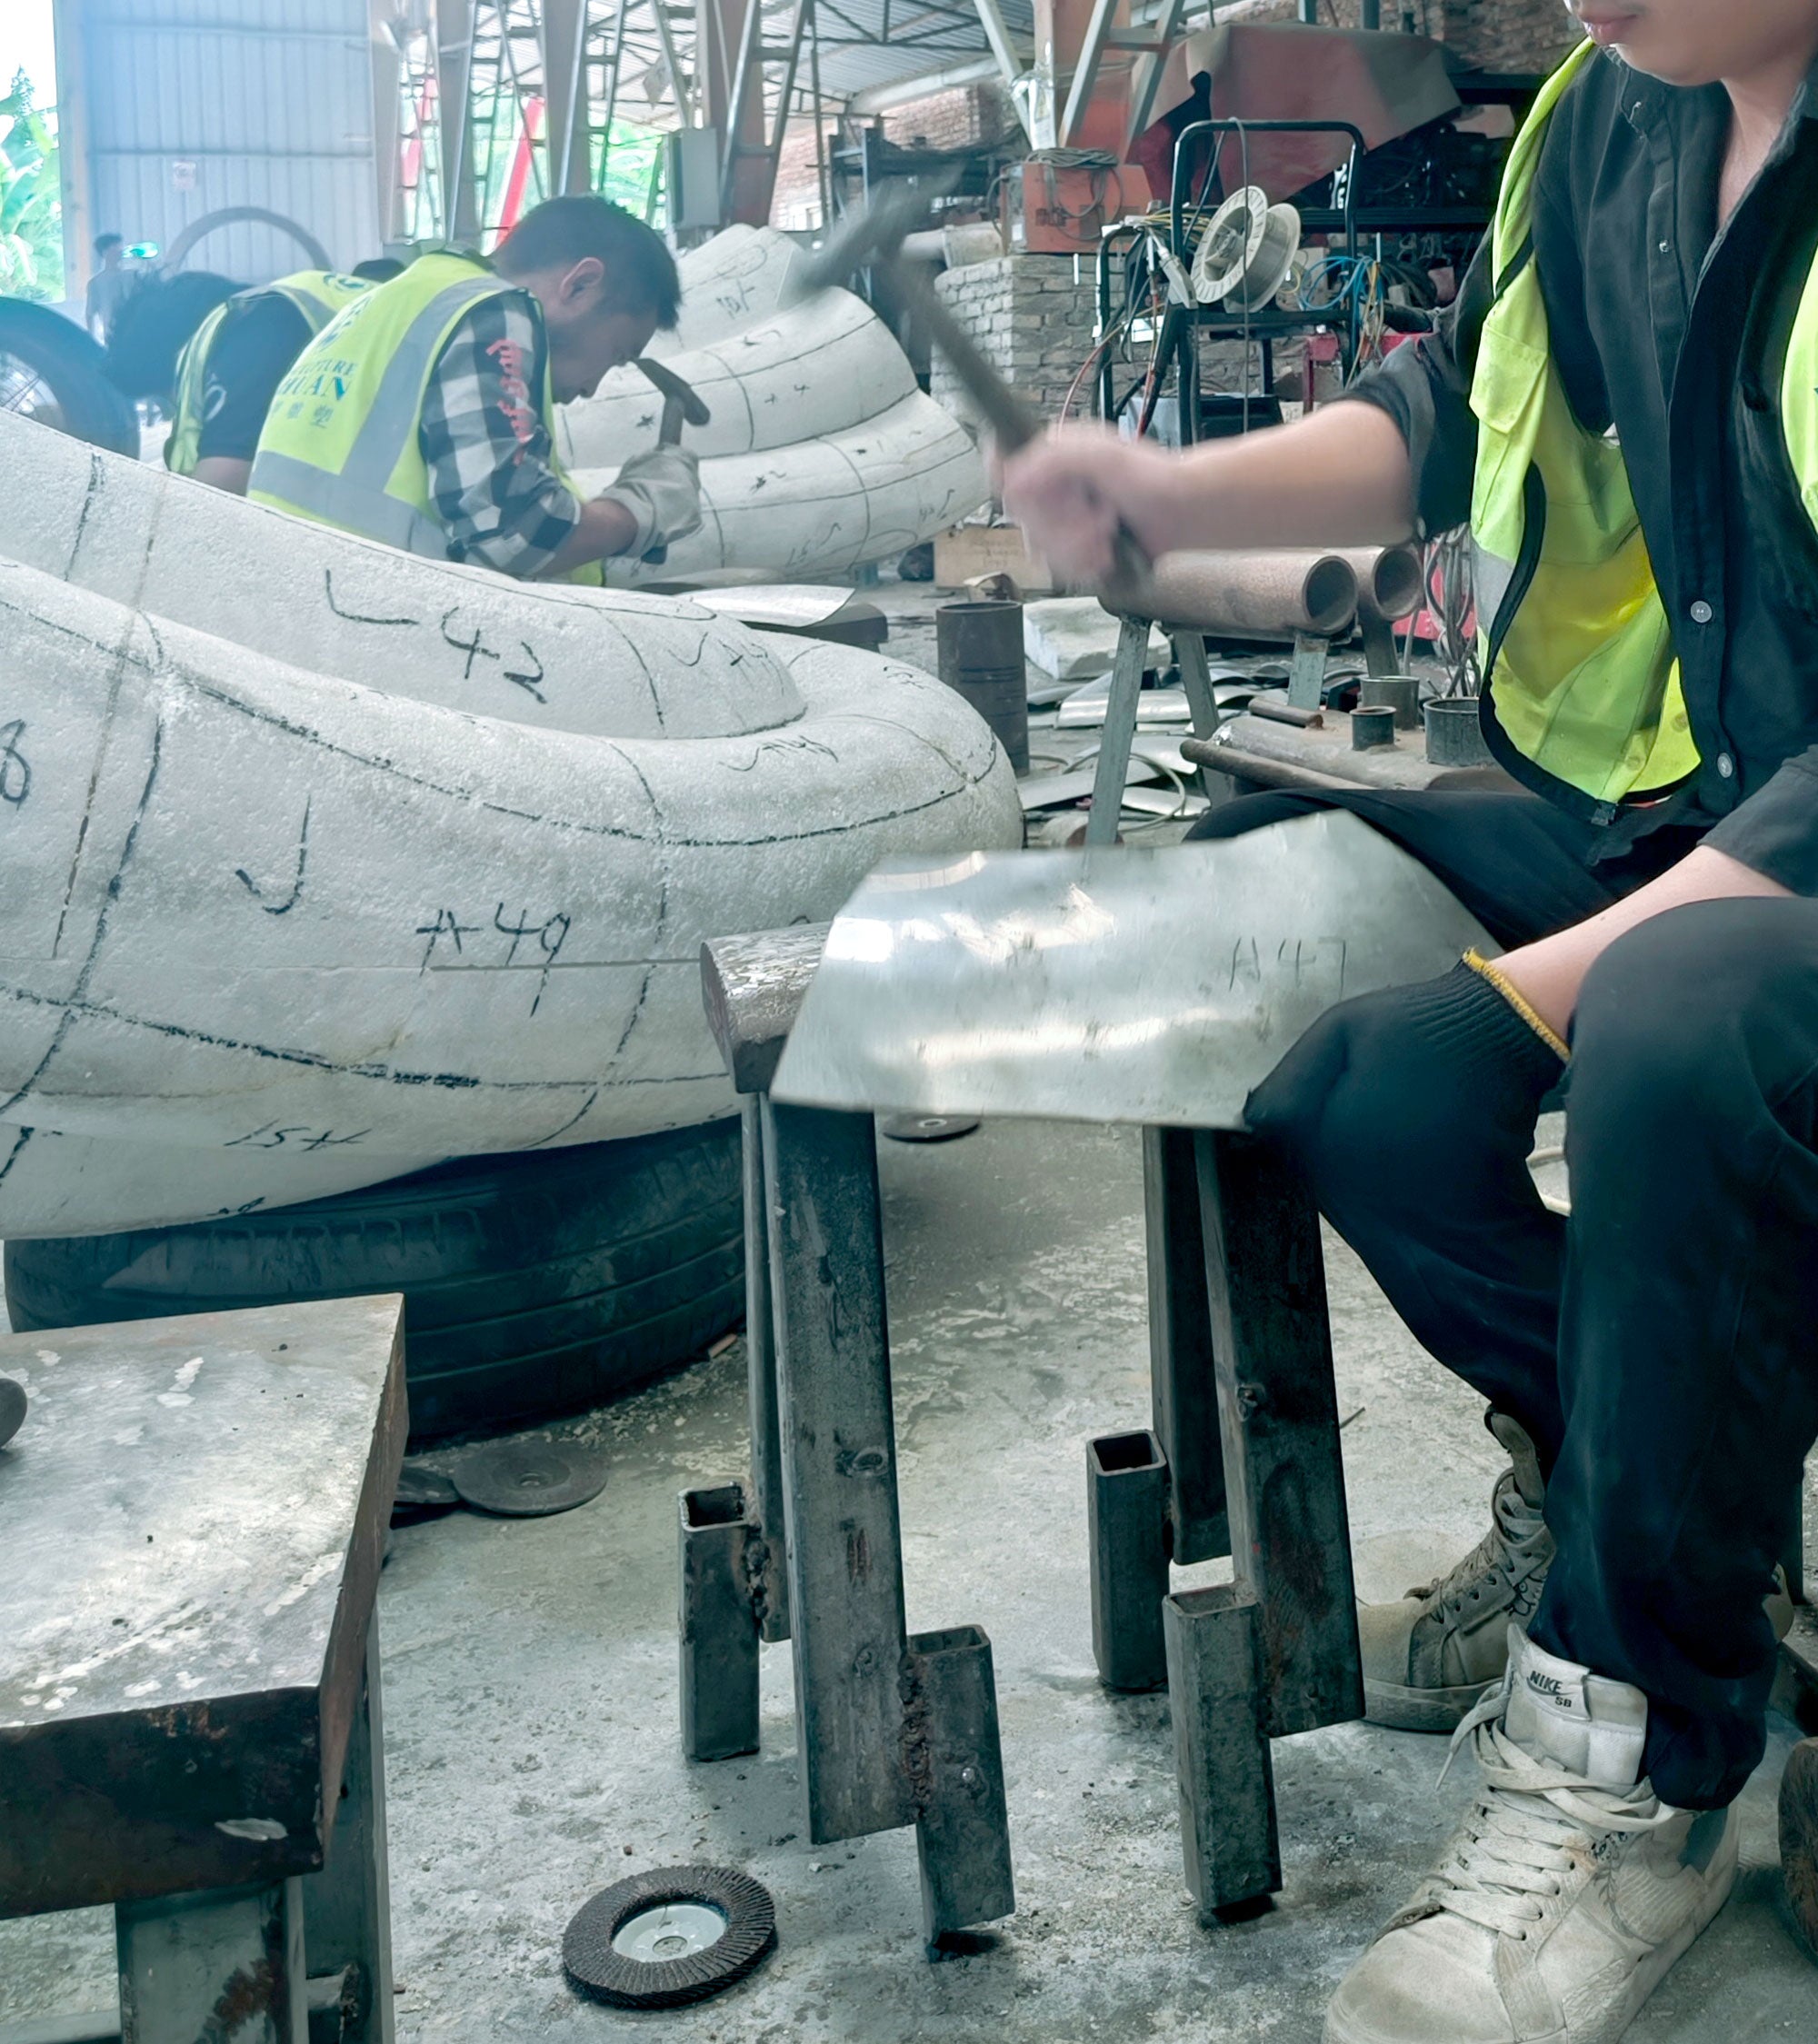
5. Shaping stainless-steel panels by hand
Flat stainless-steel sheets are hammered, rolled, pressed, and panel-beaten into curved sections. The process is physical and repetitive. Every piece has to be persuaded into shape by hand, because a curve that looks clean on screen has to survive in real metal.
6. Fitting the first metal panels
The shaped stainless-steel panels are test-fitted over the foam model. At this stage the surface still looks rough, with visible seams, heat marks, scratches, and numbered sections. This is the ugly but important middle stage, where the sculpture still shows exactly how it is being made.

7. Welding and building the continuous body
The panels are tack-welded, adjusted, and welded more fully until the separate pieces begin to become one continuous skin. The challenge is not only joining the steel, but keeping the tension and flow of the form while heat, pressure, and welding all try to distort it.

8. Polishing the stainless steel
The surface is polished through finer and finer stages until the stainless steel begins to reflect its surroundings. A mirror finish is not added like a coating. It is created by removing scratches until the metal can hold light, space, and reflection clearly.
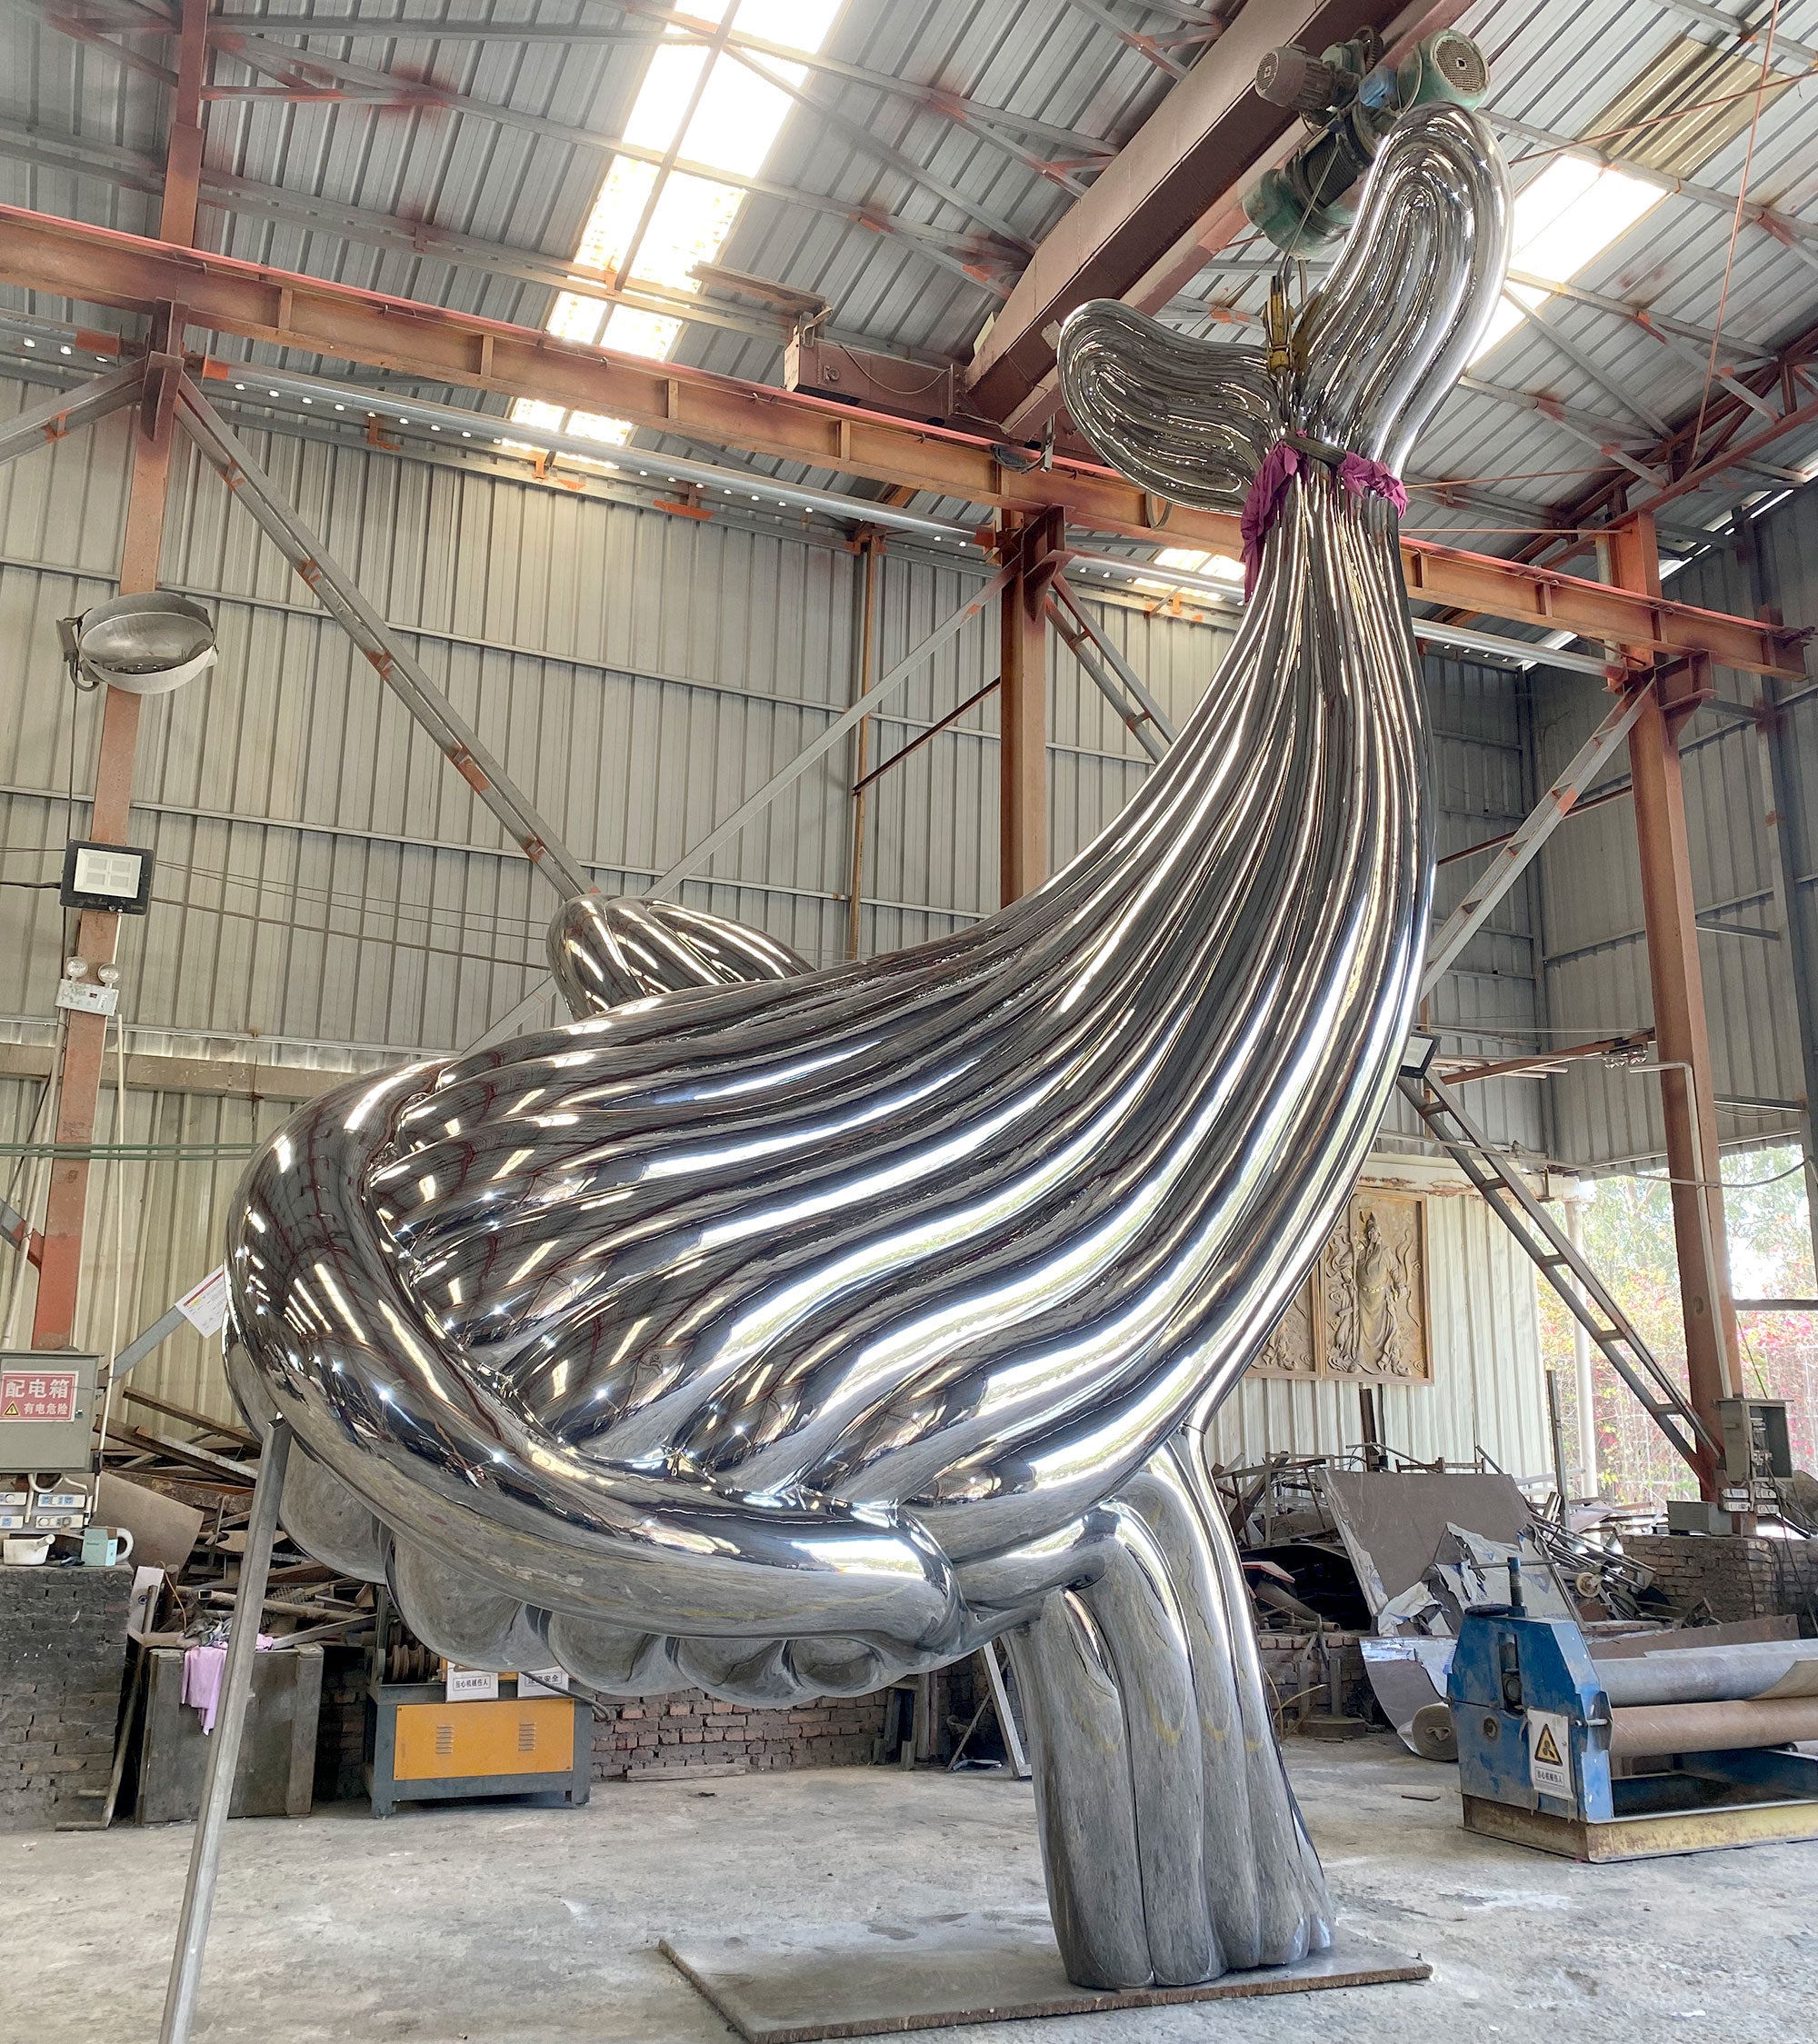
9. Finished mirror-polished sculpture
The completed sculpture has transformed from foam, templates, sheet metal, welds, and scratches into a reflective stainless-steel body. The final surface catches the workshop, the sky, architecture, people, and movement around it. The material is industrial and heavy, but the finished form feels fluid, inflated, and almost weightless.
1. I design the sculpture digitally and resolve the form, movement, and proportions.
2. The digital sculpture is divided into sections suitable for fabrication.
3. Templates, panels, and production references are prepared.
4. Stainless-steel sheets are cut, hammered, rolled, pressed, or panel-beaten into curved forms.
5. The shaped panels are test-fitted like a three-dimensional puzzle.
6. The panels are tack-welded, adjusted, fully welded, and checked again.
7. Welds and seams are ground back until the body reads as one continuous form.
8. The surface is sanded and polished through many stages until it reaches the required finish, from satin to mirror polish.
9. The final sculpture is inspected, packed, delivered, and installed.
Marble and Granite
Marble and granite are different from crystal and steel because they begin as a block.
For marble and granite, I first design the sculpture digitally. Once the form is resolved, I create detailed reference views from many angles. These become the visual map for the carver: front, side, back, top, three-quarter views, and detail references where needed.
This is where the artist's eye and the carver's hand have to meet. The digital model gives the direction, but the stone still has to be read, carved, corrected, and finished by hand. The carver is not simply copying a file. They are translating a digital form into a physical block that has grain, density, faults, weight, and resistance.
The process is subtractive. You do not pour or fabricate the form into existence. You remove what does not belong. The sculpture is already trapped inside the stone in the most inconvenient way possible, and the job is to persuade it out without destroying it.
Stone carving is slower, quieter, and more final. With digital modelling, I can undo a mistake. With wax, I can repair or rework. With steel, a panel can sometimes be replaced. But stone remembers every decision. A wrong cut is not a small technical issue. It can change the whole sculpture.
Marble has softness, depth, and skin. Granite is harder, heavier, and more resistant. Both materials carry time differently from steel or crystal. They feel older before I even touch them.
For me, stone gives animal forms a different kind of presence. A roaring lion in crystal might feel like light and appetite. The same lion in marble might feel more internal, more ancient, more uncertain. The weight of the material changes the psychology of the work.
This is why I do not think of marble and granite as just luxury materials. They carry pressure, silence, and permanence. They slow the sculpture down.
Marble or granite carving can take around 30 days before shipping, depending on the size, stone type, complexity, and finishing requirements.

Granite Foo Lions
Reference images stay close by so the carver can keep checking the form against the original plan.
- I design the sculpture digitally and resolve the form.
- I create detailed reference views from many angles.
- The stone block is selected for size, colour, density, and suitability.
- The rough form is blocked out by hand.
- The sculpture is refined gradually, from large shapes to smaller details.
- The carver checks the work against the digital references and angle drawings.
- The surface is sanded, polished, honed, or finished according to the material and concept.
- The final sculpture is inspected, packed, and prepared for shipping.
TraditionalCraftsmanship and Digital Design
People sometimes assume that because I design on a computer, the work is machine-made or somehow less handmade. I see it differently.
The computer is where I think. The material is where the sculpture proves itself.
Digital sculpting lets me build movement, exaggeration, and proportion with the control I learned from years in 3D animation. But once the work leaves the screen, it enters a much older world. Wax has to be cleaned by hand. Crystal has to be annealed. Stainless steel has to be hammered, welded, and polished. Stone has to be carved and finished through the body.
The digital model is not just a sketch. It becomes the technical reference for the whole project. From the 3D model I can create renders, maquettes, production drawings, and angle references before the material work begins. This is especially useful for commissions, public sculpture, hospitality projects, and architectural spaces, where clients need to understand scale, proportion, and surface before production starts.
The basic pipeline is:
Software → 3D-printed maquette → physical making → hand finishing
The final object is not digital. It is physical, slow, and stubborn.
I like that contradiction. The work begins in software, but it ends in heat, dust, pressure, polish, and touch. It is contemporary in the way it is designed, but old-school in the way it becomes real.
That is also why I keep returning to animals, breath, motion, and emotional states. A sculpture has to hold something that is felt before it is explained. The process is technical, but the point is not technique for its own sake.
The point is to make something that carries presence.
Something that feels alive, even though it cannot move.
Production Time
Production time depends on size, material, finish, edition, and shipping. A small crystal colour edition can take around 40 days. Marble or granite carving can take around 30 days before shipping. Stainless-steel works can take 45 days or longer, and large public or custom projects may take several months because they involve design approval, engineering, fabrication, finishing, packing, transport, and installation planning.
These timelines are guides, not promises. A sculpture can be delayed by material behaviour, kiln schedules, polishing problems, stone flaws, foundry availability, shipping, weather, installation conditions, or the simple fact that a handmade object sometimes refuses to behave.
Sculpture Process FAQ
I design the sculptures digitally first, then translate them into physical form through traditional making processes: lost-wax crystal casting, lost-wax bronze casting, stainless-steel fabrication, marble carving, granite carving, grinding, sandblasting, polishing, and hand finishing.
They begin digitally, but the final objects are handmade. The computer helps me resolve the form, but the sculpture still has to be cast, welded, carved, ground, polished, corrected, and finished by hand.
Lost-wax crystal casting is a kiln-based process where a wax form is invested in a refractory mold, the wax is burned out, and crystal is melted into the empty cavity inside a kiln. The piece must then cool slowly through annealing before it can be de-molded, cut, ground, sandblasted, polished, and inspected.
It is related to those traditions, but not identical. Lalique, pâte de verre, and Chinese liuli are important references for kiln-cast glass and crystal traditions. My crystal process uses similar lost-wax principles, but each studio and foundry has its own material recipes, firing schedules, surface finishes, and production methods.
Large stainless-steel sculptures are usually fabricated from sheet metal. The digital form is divided into sections, stainless-steel panels are shaped by hand, the panels are fitted together, welded, ground, sanded, and polished until the sculpture reads as one continuous reflective body.
316 and 316L stainless steel are better suited to outdoor sculpture because they offer stronger corrosion resistance than standard 304 stainless steel. For mirror-polished outdoor sculpture, coastal environments, or heavy-weather public art, the correct stainless-steel grade matters because the surface has to survive time, weather, cleaning, and public exposure.
I often prefer stainless steel because it can be polished to a cleaner, more precise mirror finish. Bronze has warmth and history, but stainless steel suits the precision of my digital forms and reflects the viewer directly into the work. The reflection becomes part of the emotional experience.
Yes. A commission can begin from an existing design in a new size or material, or it can be a bespoke sculpture designed for a specific collector, hotel, developer, public space, or architectural site. The process normally begins with discussion, visual references, scale, material, budget, timeline, and the emotional reason for the work.
It depends on the material and scale. A small crystal colour edition can take around 40 days. Marble or granite carving can take around 30 days before shipping. Stainless-steel works can take 45 days or longer. Large public or custom projects may take several months because they involve design, engineering, fabrication, finishing, packing, shipping, and installation planning.
I design public sculptures and can work with fabrication partners, foundries, engineers, architects, developers, and installation teams to take a work from concept to physical production. Depending on the project, I may handle design and manufacturing coordination, or design only.
The most useful starting information is the intended location, approximate size, indoor or outdoor placement, preferred material, budget range, deadline, installation requirements, and why the sculpture is being commissioned. The emotional reason matters as much as the technical brief.
For outdoor public sculpture, stainless steel is often the strongest option, especially 316 or 316L stainless steel for mirror-polished or exposed environments. Bronze, granite, and some stone works can also be suitable, depending on the site, climate, finish, maintenance plan, and installation method.
A collector sculpture is usually made for an interior, private collection, gallery, or smaller architectural setting. A public sculpture has to deal with scale, structure, weather, transport, installation, safety, visibility from a distance, maintenance, and how people move around it.
Digital design lets me control proportion, emotion, movement, and surface before production begins. It also allows collectors, architects, developers, and commissioners to see the sculpture clearly before the material is touched. Changes are much easier on screen than in a kiln, foundry, stone block, or fabrication workshop.
Short Explanations for Events, Galleries, and Collectors
I make the form in wax first, cast it into crystal inside a kiln, then spend days cooling, cutting, grinding, sandblasting, and polishing until the light works properly inside the sculpture.
Even shorter: It is not just glass poured into a shape. It is a slow kiln-cast sculpture where the light, colour, and surface are built through heat and hand finishing.
I make a wax version of the sculpture, burn the wax out of a mold, pour molten metal into the empty space, then clean, chase, polish, or patinate the final casting by hand.
Even shorter: Bronze casting is old-school sculpture magic: wax disappears, metal takes its place, and then the surface is brought to life by hand.
I design the form digitally, then the sculpture is built from shaped stainless-steel panels that are welded, ground, and polished until the seams disappear and the metal becomes a reflective skin.
Even shorter: It starts as hard industrial sheet metal, then after a lot of hammering, welding, and polishing, it begins to look almost alive.
I design the sculpture digitally, create detailed angle references, and then the carver translates that form by removing stone slowly until the animal emerges from the block.
Even shorter: With stone, you do not build the sculpture. You remove everything that is not supposed to be there.
The computer is where I solve the form, but the material is where the sculpture proves itself. The final object is still made through heat, pressure, dust, polishing, and touch.
Even shorter: I use digital tools to think, but old-school craft to make the work real.
The value is not only the material. It is the number of decisions, failures avoided, surfaces corrected, and hours of handwork needed before the sculpture feels effortless.
Even shorter: The cleaner it looks at the end, the more work it probably took to get there.
I design my sculptures digitally, then translate them into physical form through old-school, hands-on processes: lost-wax crystal casting, stainless-steel fabrication, lost-wax bronze casting, stone carving, grinding, polishing, sandblasting, and hand finishing.
The computer helps me shape movement. The material decides whether the sculpture is honest.
Crystal holds light. Stainless steel reflects the world. Marble and granite carry weight, silence, and time. Each material changes the emotional register of the same form, which is why process is not separate from meaning in my work.